We all know how important it is to make backups of existing websites in order to be able to act in case of a hack or other problem. Here we would like to show you what a secure, cost-effective and fully automated solution for daily backups can look like.
Table of Contents
The basics: Why you should make backups and how you should save them
Basically, you should always have a working backup of your own website, or those of customers for whom you have taken over the administration and maintenance of corresponding Joomla! installations. The reasons for this are numerous:
- Protection and ability to act in case of hacks (if they are noticed early enough)
- Data backup in case of problems after installing updates / new features
It is important to understand that hackers almost never attempt to destroy the site itself or damage your business. Much more interesting are the resources behind the website - the web space on which the page is located. If successfully taken over, these resources can be used in many ways for criminal activities (e.g. sending spam). Since these are not targeted attacks, there is no website for which the myth applies: "Nobody is interested in my website anyway - I won't be hacked".
At the same time this results in another important insight: Since a successful hack has control over the web space and accordingly all files on the web space can be manipulated and provided with malicious code, we have to save backup files on an external system.
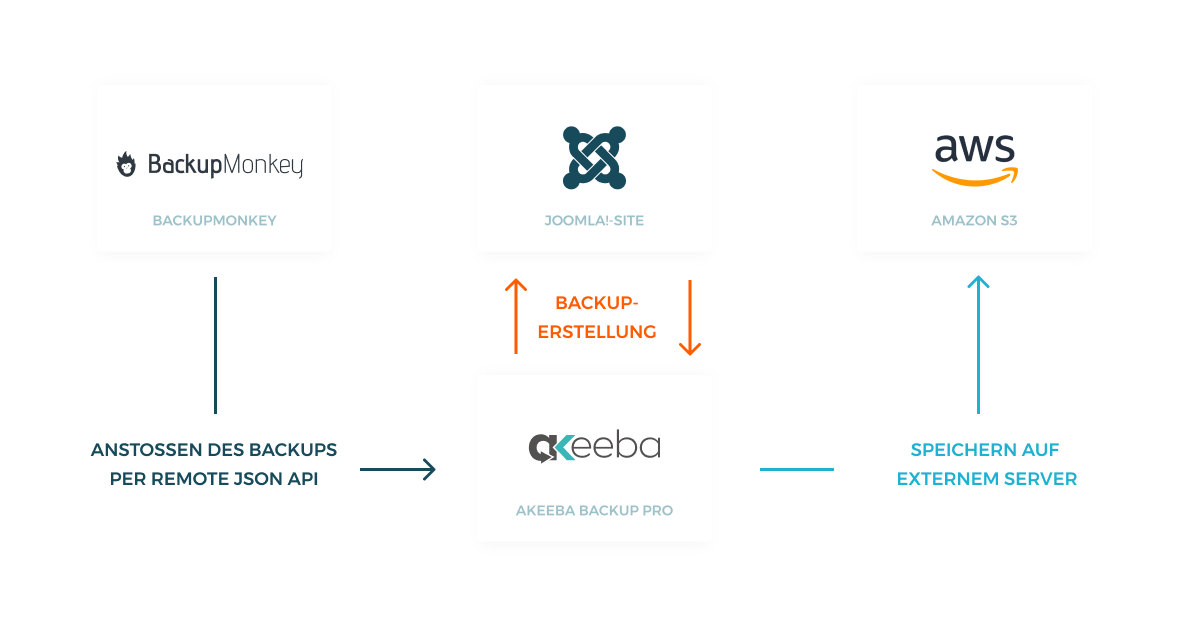
Our Setup: Akeeba Backup PRO, BackupMonkey, Amazon S3
Create and transfer backups with AkeebaBackup
Probably the best known Joomla! backup component on the market is AkeebaBackup (https://www.akeebabackup.com/) and we also use it to make backups of our pages.
AkeebaBackup combines a variety of functions to a mature product and impresses on the one hand by a very easy basic configuration with a clear user interface and on the other hand by extensive configuration options for advanced users. Add to this the fact that AkeebaBackup simply works and does exactly what it is supposed to do - to perfection.
AkeebaBackup is offered in two different versions: the free version AkeebaBackup Core and the paid version AkeebaBackup Pro. We would like to recommend the paid version, which offers two decisive advantages over the core version:
- Remote backups via Akeeba remote JSON API
- Storing backup archives on other servers is supported - in our case storing on Amazon S3 storage.
These two features allow us to initiate backups from outside (BackupMonkey) and then store them with an external storage provider instead of on our web space.
Store backups with Amazon S3
To store backups we use Amazon S3 from Amazon Web Services (https://aws.amazon.com/de/s3/). There are two main reasons for this:
- Amazon S3 is infinitely scalable and at the same time incredibly inexpensive. So it is an amazingly economical solution to our problem.
- Amazon S3 offers the possibility to create a separate user account for each website from which data is transferred to the server via Akeeba. This ensures that backup archives that should not be accessible can not be accessed. In addition, the user can be granted write access, but rights to delete files on the server can be explicitly denied. This prevents backup archives that have already been created from being deleted in the event that the page is taken over.
The rights management therefore offers extensive configuration options that make our setup secure. However, explaining these in depth would go beyond the scope of this blog post, and there is already extensive documentation available on the net (https://docs.aws.amazon.com/de_de/AmazonS3/latest/dev/access-control-overview.html).
Backupmanagement and automization with BackupMonkey.io
BackupMonkey provides you a centralized view of all Joomla! installations that you have added to your account. This allows you to manage a large number of Joomla! installations with a few simple steps.
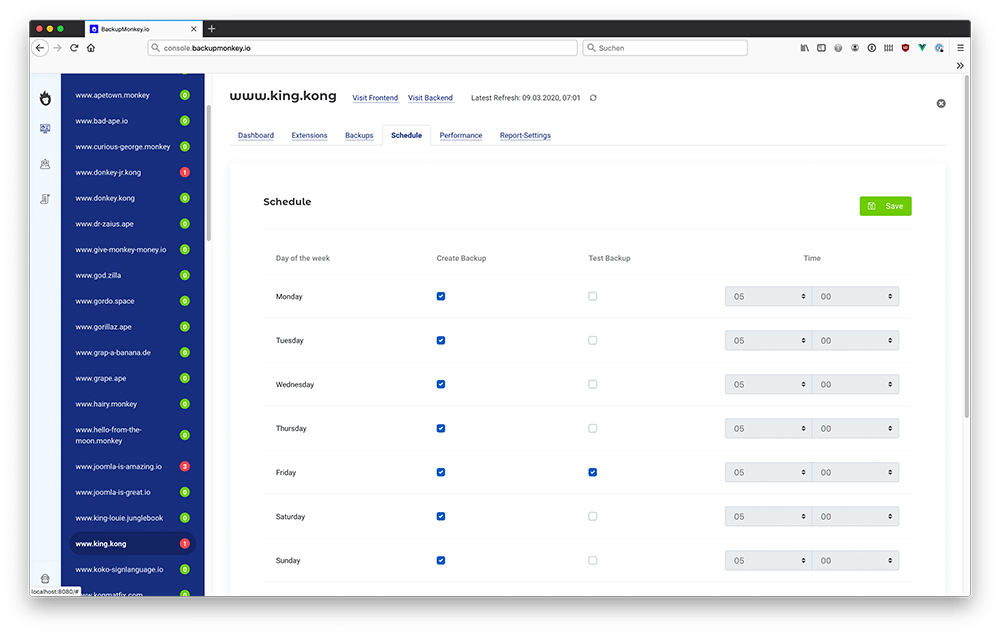
BackupMonkey also allows us to use a weekly scheduler to determine for each day whether a backup should be made and whether it should be tested or not. Once we have set up our backup plan initially, it is enough for us to see if everything works as usual in the future.
A step-by-step guide
In the following we would like to give you a step-by-step guide and lead you through the configuration of the tools. We assume that you already have an account at Amazon Web Services and that AkeebaBackup Pro is installed on your site.
Amazon S3 - Sample configuration
Step 1: Create an Amazon S3 bucket to store future backup archives.
For this we open our AWS management console, search for the service "S3" and then create a new bucket.
Step 2: Create a new policy per page.
For each of the sites from which backups are transferred to our Amazon S3 storage via AkeebaBackup you need to create a separate policy and user (see step 3).
To do this we first search for the service "IAM" in the AWS Management Console and open it.
To create a new policy, click on the "Create Policy" button in the "Policies" section and then copy the following JSON into the editor. IMPORTANT: Adjust the resource paths to match your personalized setup.
Then save the policy under the name : "s3-DOMAINNAME
{

    "Version": "2012-10-17",

    "Statement": [

        {

            "Sid": "VisualEditor0",

            "Effect": "Allow",

            "Action": [

                "s3:PutObject",

                "s3:GetObject"

            ],

            "Resource": "arn:aws:s3:::BUCKETNAME/DOMAINNNAME"

        },

        {

            "Sid": "VisualEditor1",

            "Effect": "Allow",

            "Action": [

                "s3:PutObject",

                "s3:GetObject"

            ],

            "Resource": "arn:aws:s3:::BUCKETNAME/DOMAINNNAME/*"

        }

    ]

}
Step 3: Create a new user
As described above, a separate user has to be created for each website. Select "Programmatic access" as access type and in the next step select the previously created policy under "Directly attach existing policy".
Step 4: Copy Keypair
Copy the provided keypair as you will need it for the configuration of AkeebaBackup.
Configure AkeebaBackup Post-Processing
After we have successfully prepared our Amazon S3 storage, the next step is to configure our Akeeba so that backup archives are transferred automatically.
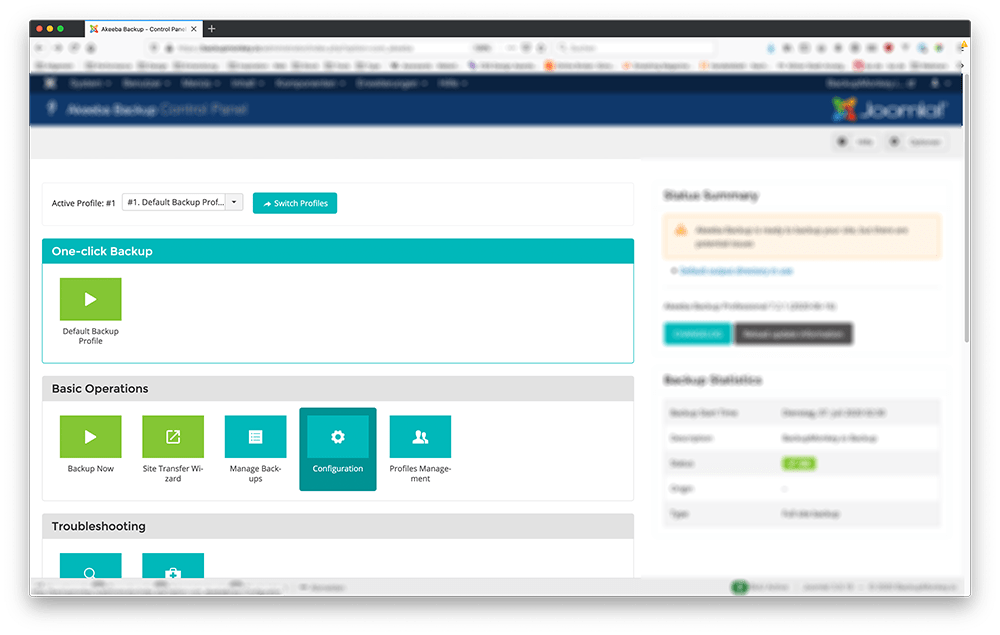
To do this we open Akeeba Backup and click on the "Configuration" button. Afterwards the following settings must be entered for our backup profile:
- Post-Processing "Upload to Amazon s3", Configure:
- Enter keypair that were previously generated at Amazon IAM
- Enter Bucketname
- Region EU (Frankfurt)
- Directory /DOMAINNAME/
- Storage Class Infrequent access
- Quota Settings
- Enable Remote Quota: False
Note: It is important to delete outdated backups at regular intervals (e.g. every 60 days), otherwise the S3-Bucket contains unnecessarily large amounts of data and causes corresponding additional costs.
That's it - after successful saving, AkeebaBackup is fully configured and backup archives are no longer stored on the webspace but on our external Amazon S3 storage. It is recommended to test this once for each page to make sure that everything has been configured correctly.
Automation with BackupMonkey.io
The last step is to add the site to your BackupMonkey.io account and activate the weekly schedule for your site shown above. Everything is now fully automated and you finally have more time for the things you really enjoy.
To do this, just select the desired weekdays on which a backup should be made in the "Schedule" tab of the page settings and additionally determine if it should be tested.
Any Questions?
Congratulations - you did it. What still seems very complex for the first page, turns into child's play already with the setup of the second page and saves you time and nerves in the future.
We hope that our instructions helped you! You have questions about the described setup or ideas to improve it? Just send us mail: