Introduction
What is BackupMonkey?
BackupMonkey is the tool of choice for maintaining your Joomla! installations and testing backups. BackupMonkey provides a web interface for centralized technical administration of any number of Joomla! installations.
With the help of a simple connector, RemoteMonkey, which is installed in the form of a Joomla! plugin in the corresponding Joomla! installation, a secure connection to the respective website is established.
The functional range is extensive and ranges from simple Joomla! core updates to backup tests and is primarily aimed at agencies and freelancers who want to establish Joomla! maintenance contracts as a business model in their company.
BackupMonkey works on Joomla 3! and Joomla 4! and 5! installations (with and without compatibility plugin).
You want to learn how to establish Joomla! maintenance as a lucrative business model in your company? Take a look at our blog.
Getting Started
The first step is to create an account on backupmonkey.io. With this account you can use our service with all features for 30 days free of charge and without risk.
Payment information is only collected once the trial period has expired and the account is converted to a paid subscription.
RemoteMonkey
The connection between the central maintenance interface and the individual Joomla! installations in the system is established with the help of a simple Joomla! plugin, RemoteMonkey.
The RemoteMonkey is deliberately programmed simple and "stupid" to prevent security issues and to minimize the data transfer between sites and service.
The code architecture of RemoteMonkey does not allow it to take control of a Joomla! installation. For example, no user data can be changed, extensions installed or code executed.
Connecting sites
Download RemoteMonkey
Download the latest version of RemoteMonkey and install the appropriate RemoteMonkey package. The installation works the same as the installation of any other Joomla! extension - just upload the appropriate package under Extensions/Manage/Install and wait until the installation is complete.
Connect site to BackupMonkey account
After successful installation of the RemoteMonkey, a notification appears asking you to log in to console.backupmonkey.io. After successful login the page is automatically added to the account and is now visible in the page list.
If you are already logged in with a BackupMonkey profile while installing the RemoteMonkey, the page will automatically be added to the active account.
User Interface in a Nutshell

Dashboard
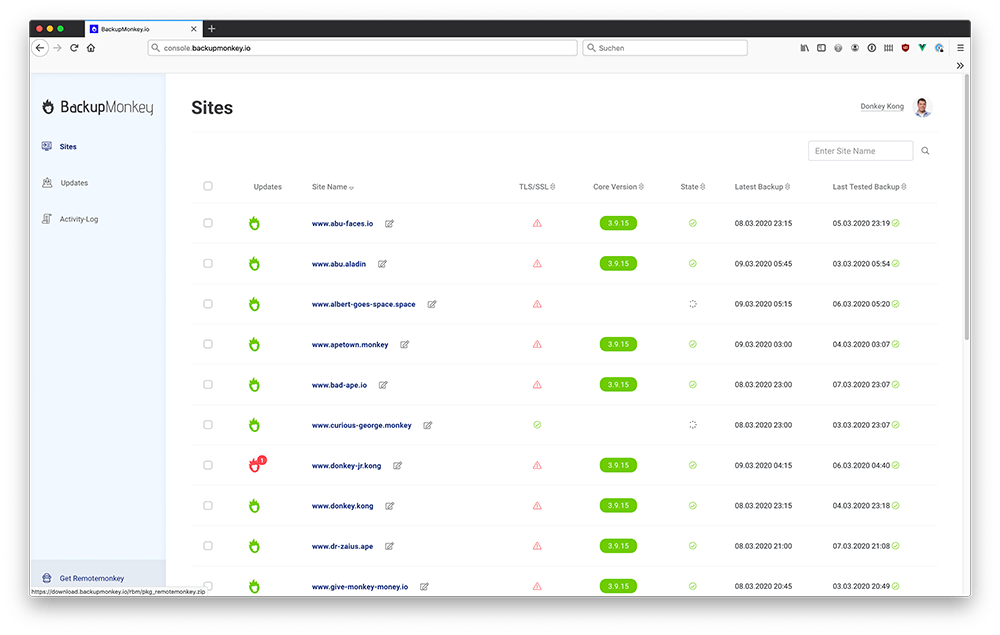
The dashboard of BackupMonkey provides an overview of all connected Joomla! installations and all relevant information about the respective connected site at a glance:
- Sitename
- Number of available extension updates
- Core-Version
- Site availability
- TLS/SSL status
- Time of the last backup made
- Time of the last successfully tested backup
Site View
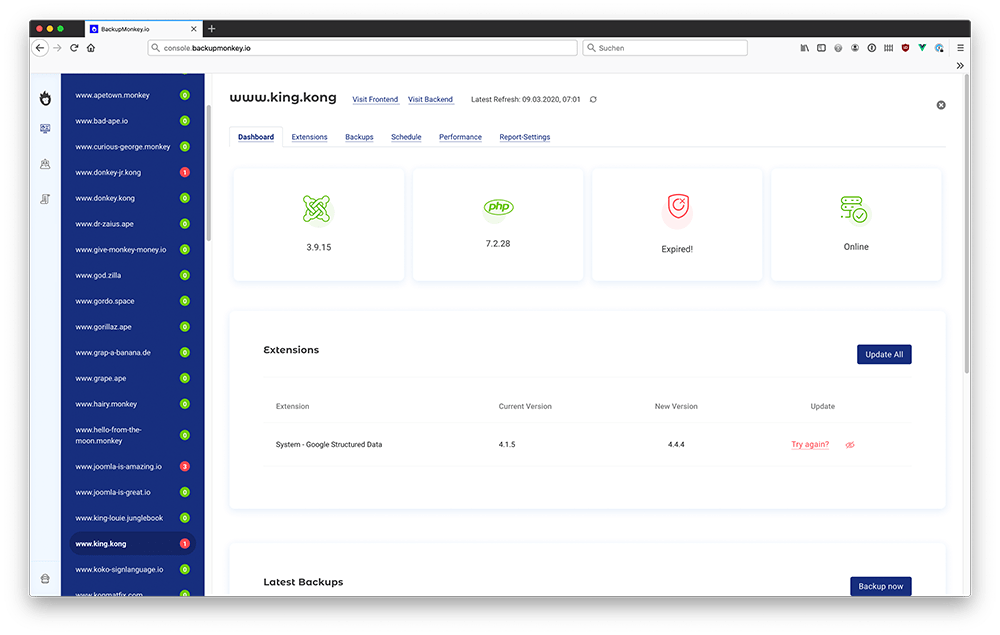
By clicking on the page name, you will get to the detail view of the corresponding page. Here you can update extensions, initiate backups and test existing backups. In addition, an overview of all extensions installed on the page is displayed.
A click on the Schedule button takes you to the settings for the Backup-Plan. Moreover you can fill in the data for contactpersons and contactmail in the area "Report Settings".(Learn More: Maintenance reports)
Joomla! Core Updates
With just one click, the core version of a Joomla! installation can be updated to the current version at any time.
BackupMonkey uses the functionality provided by the Joomla! core. BackupMonkey only follows the installation mechanisms that are also triggered by an update from the administration interface of the site.
Backups
BackupMonkey offers the possibility to create backups and test them for their functionality. This way you can always be sure that a working, up-to-date backup is available for a site and that it can be restored if necessary. The only requirement is an installed and ready to use Akeeba Backup Pro Component.
BackupMonkey.io does not store backup data on its own servers. Backup packages are stored in the directory defined by Akeeba configuration.
Configure Akeeba Backup
To use the backup features of BackupMonkey.io an installed and ready to use Akeeba Backup Pro component is required. Using the RemoteMonkey all relevant functions are executed and monitored from the web interface.
Attention: Since AkeebaBackup 7.0 (Akeeba-Statement / Dec. 2019) the Akeeba remote JSON API is no longer part of the AkeebaBackup core version. Accordingly, from Akeeba 7.0 on the Pro version is required to use the backup functions of the BackupMonkey. For installations where only the core version of AkeebaBackup is installed, it is unfortunately not possible to start or test backups.
For all BackupMonkey.io customers we provide a 30% discount code when purchasing AkeebaBackup Pro. Simply write us at
Backup creation
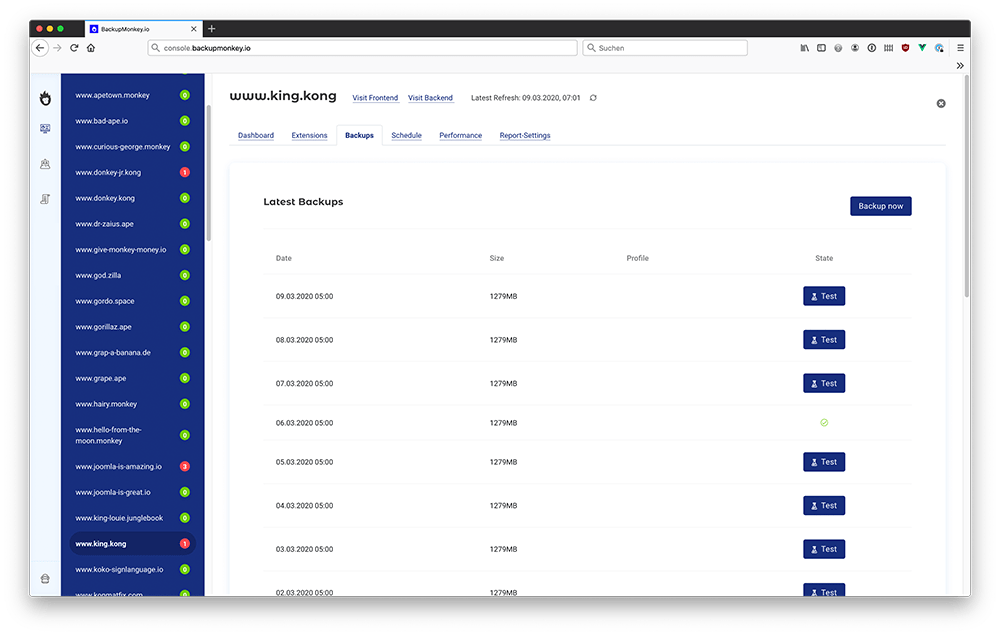
From the detailed view (See User Interface) of each page, the creation of a backup of the selected page can be initialized at any time. To do this, simply click on the Backup Now button in the Latest Backups section.
Please note that depending on the size of the page it may take some time until the backup is created.
Backup-Testing
When a backup test is initialized, a copy of the backup package is temporarily transferred to the BackupMonkey.io server infrastructure. The transfer is done using a secure connection.
The backup package is then unpacked inside a docker container under realistic conditions and then the Joomla! installation process is run. If the installation is successful, the test is also considered successful.
Finally, all transferred data is deleted and does not remain on the server infrastructure of BackupMonkey.io.
Further test mechanisms are planned for the future. These include screenshots and complex click tests.
Automated Backups
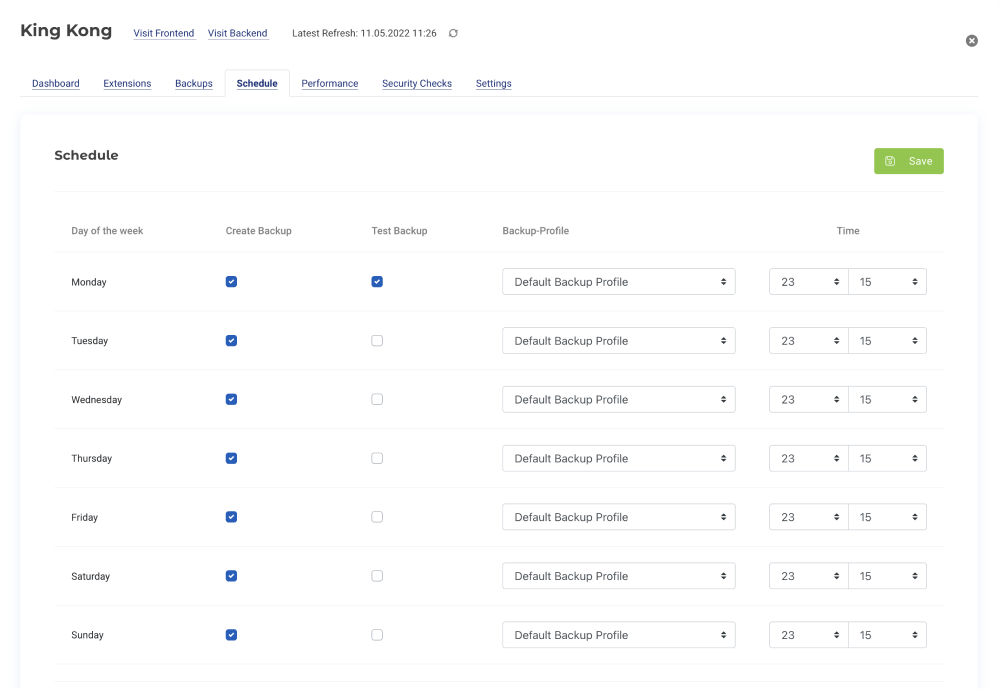
With the help of a convenient weekly backup-schedule, the creation and testing of backups can be automated quickly and conveniently.
For each day of the week it can be freely defined whether a backup should be made or not. For each backup the desired Akeeba backup profile can be selected and if desired a backup test can be initialised.
Extension-Updates
BackupMonkey supports remote updates for all Joomla! extensions that use the regular Joomla! updater to provide extension updates. Extensions that use an update mechanism detached from the Joomla! updater cannot be supported.
Manual Updates
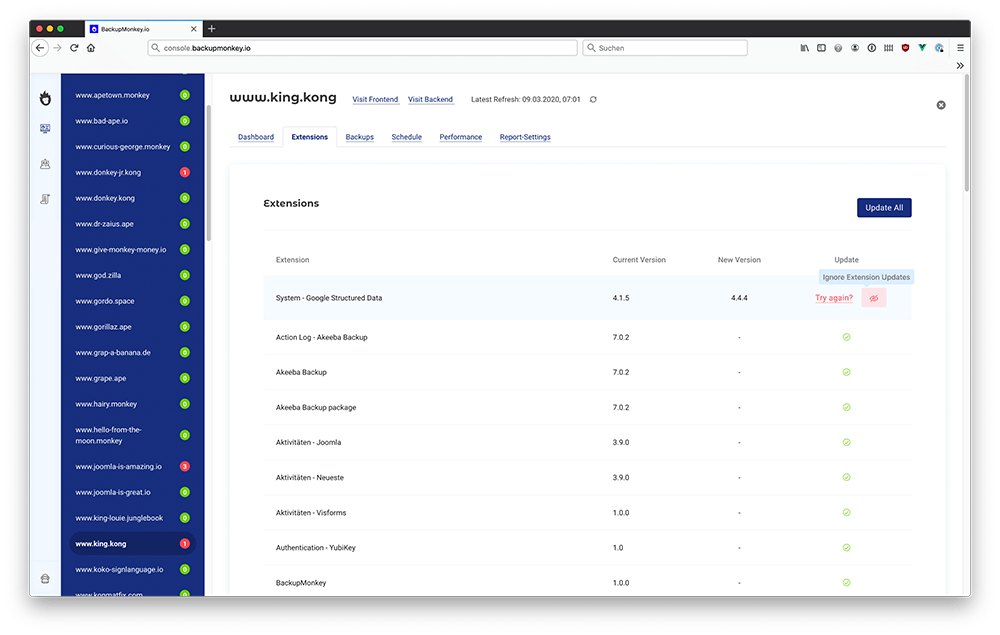
From the detailed view (see User Interface) of each page, the creation of a backup of the selected page can be initialized at any time. A simple click on the Update button in the corresponding table row of the desired extension is sufficient.
In addition, the Update page, accessible via the "page navigation", provides an overview of all available updates on all connected pages. From this view, updates can also be imported or extension updates for the future can be ignored. Mass functions simplify the daily work and minimize the time expenditure to a minimum.
Automated Extension Updates
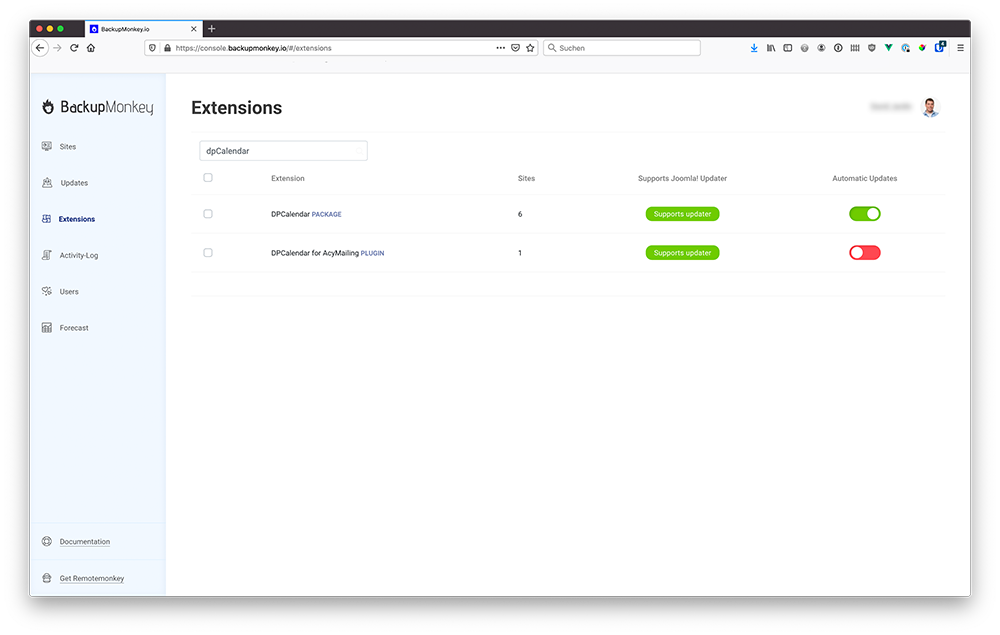
BackupMonkey supports the automated installation of extension updates and saves a lot of time. If the automatic update for an extension on a connected Joomla site is activated, the system checks every four hours maximum or during a page refresh whether an update is available. If an update is available, it will be installed afterwards.
Update Sites
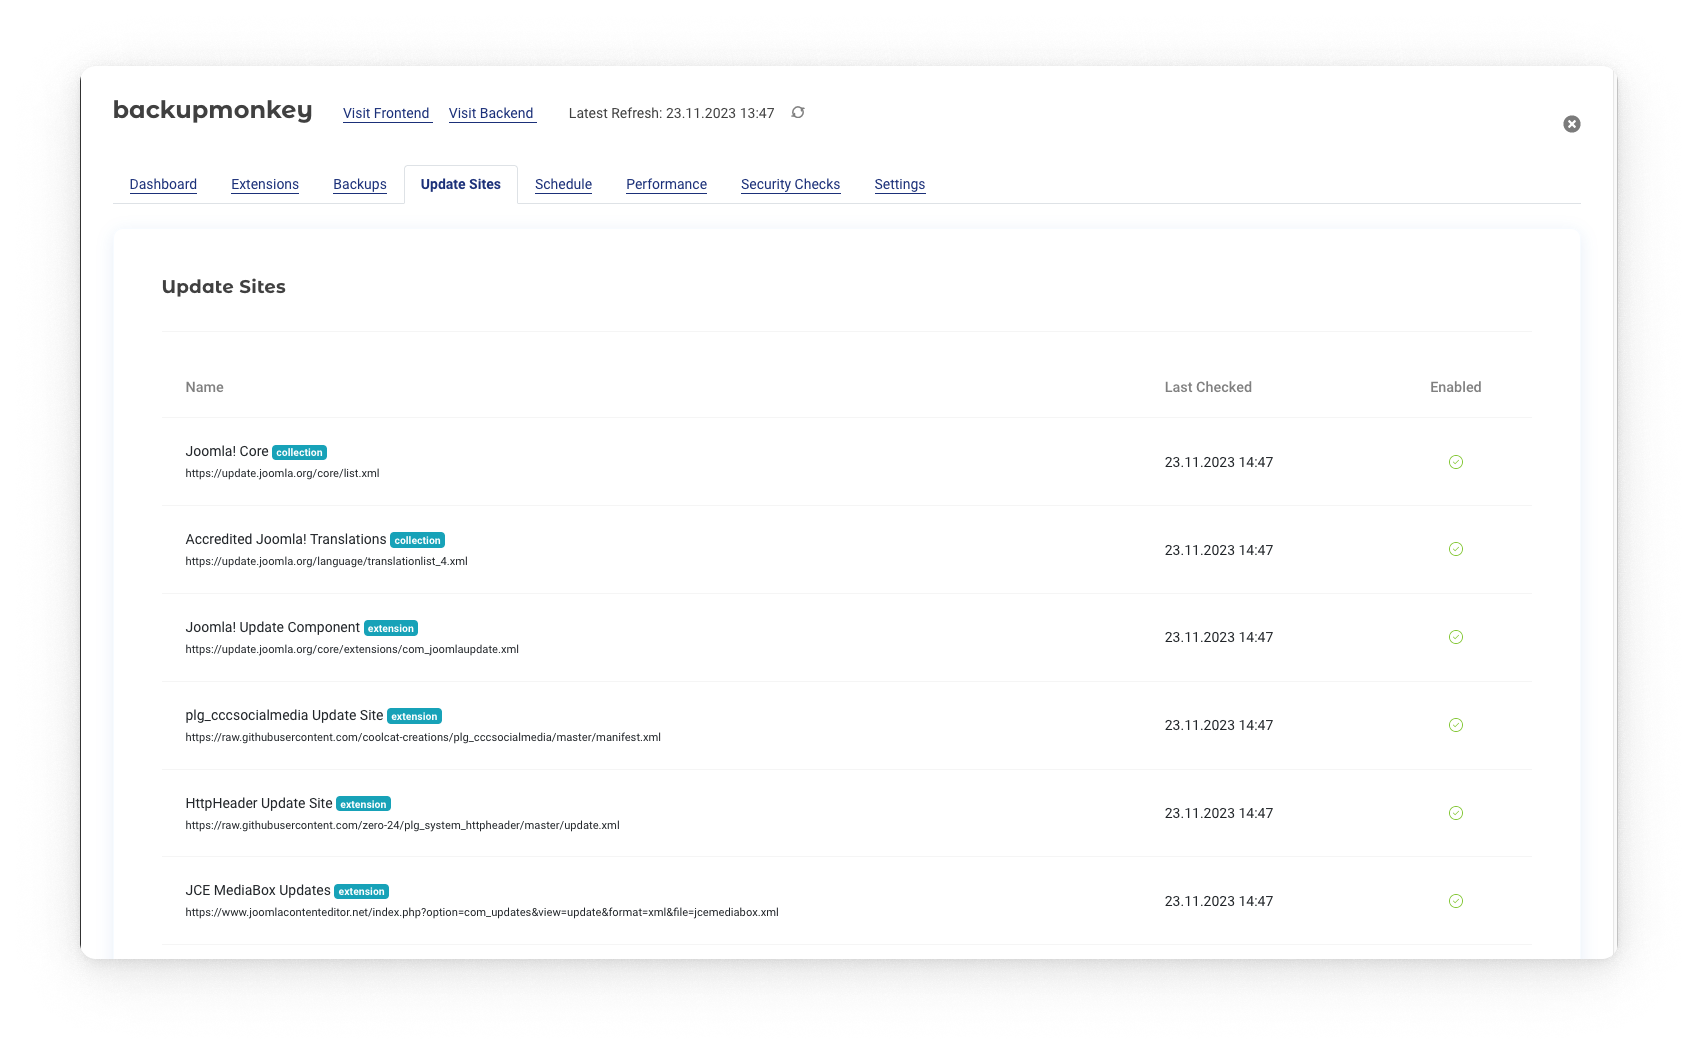
The BackupMonkey panel provides a detailed list of all update sources configured for each page. If an update source is disabled (resulting in failed updates or not being displayed), it can be conveniently reactivated with just one click in the Admin panel.
Global Settings

The menu item "Extensions" provides a list of all extensions installed on the connected pages. The installed extensions are categorized by extension type:
- Package
- Component
- Plugin
- Module
- File
Additionally, the overview shows information on how many of the connected websites the extension is installed on and whether the Joomla! updater is supported.
For each installed extension it can be defined globally whether extension updates should be automatically installed or not. The desired default value is then applied to all sites.
Page-specific settings
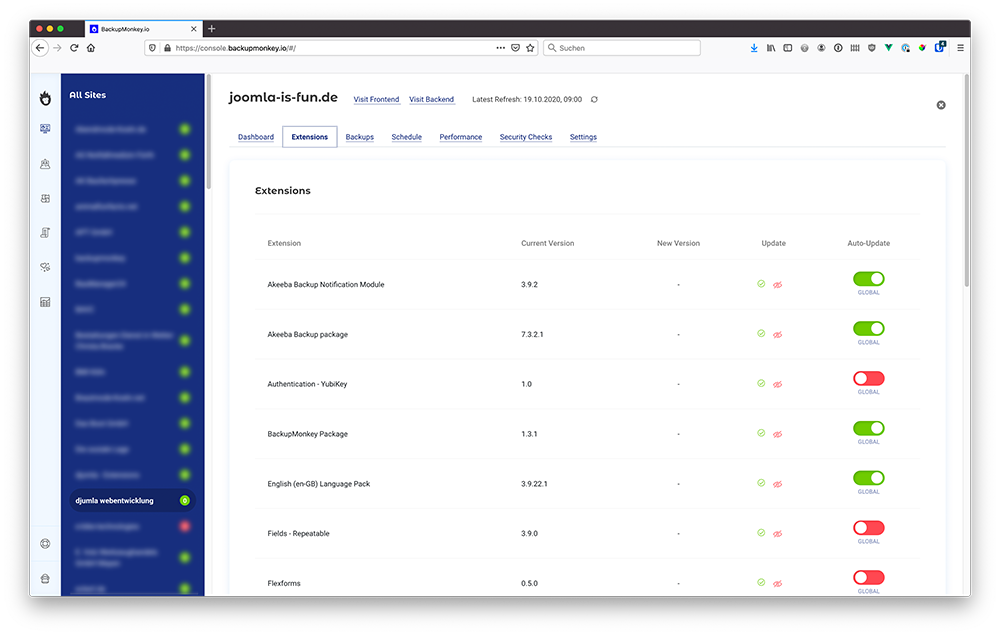
The global setting can be overwritten page-specifically for each extension. The corresponding setting option can be found in the extension list of the respective page
If an automated extension update fails, the system will try a maximum of two more attempts to install the desired update. A mail is then sent and the extension update must be installed manually.
Automatic backups
In order to minimize the risk with automatic extension updates, it is possible to create a backup of the site before installing an update.
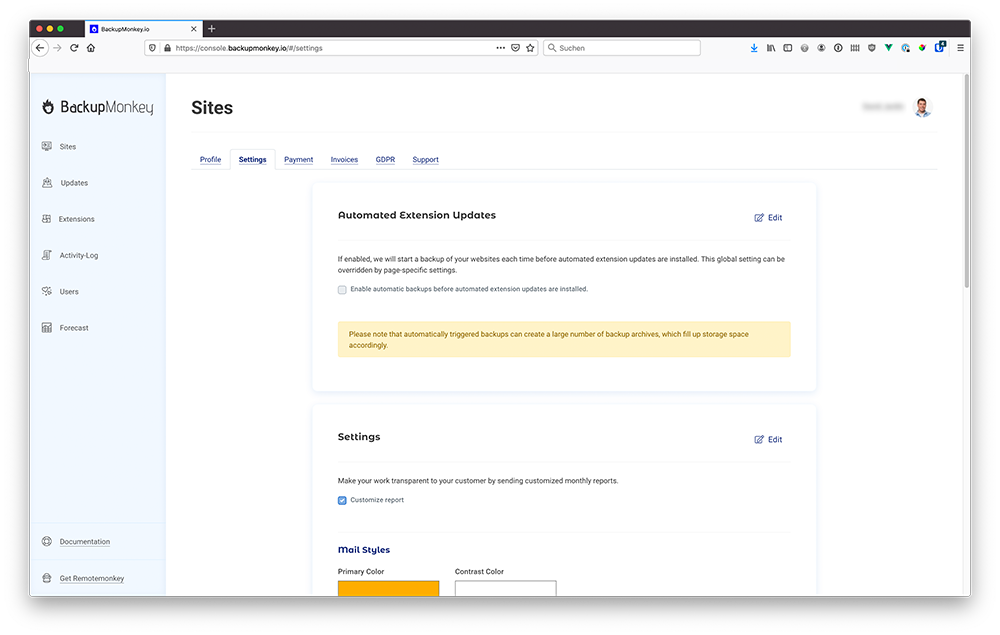
Global Settings:
The settings to enable/disable automatic backup creation are located in the "Settings" section of your Profile Settings. The value selected here can be overwritten page-specifically, for example to exclude very large pages.
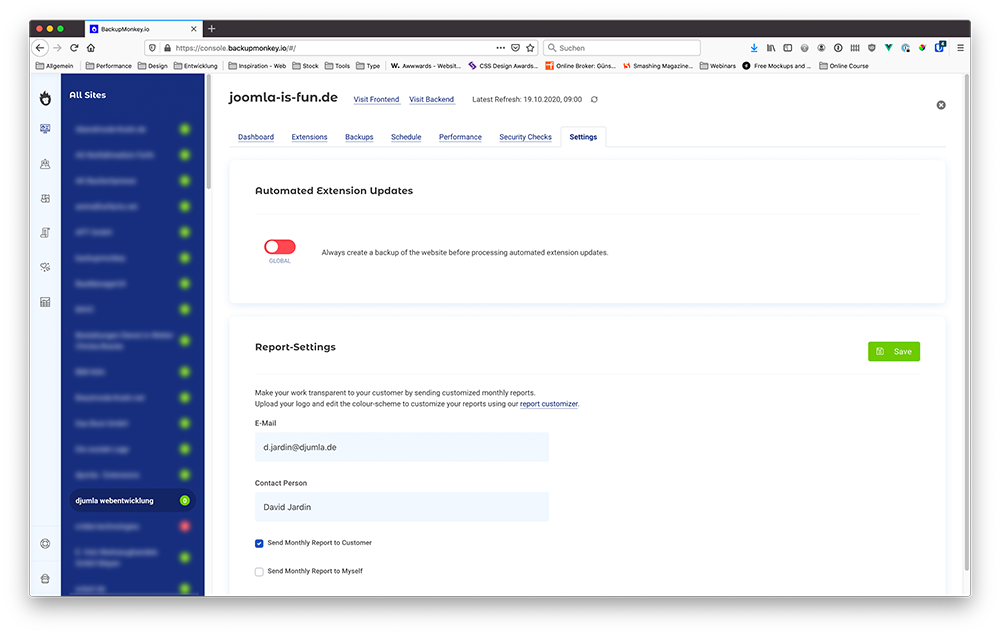
Page-specific settings:
The globally defined setting can be overwritten in the Settings section of the detailed view of a connected page.
Ignore Extension-Updates
BackupMonkey allows you to selectively ignore extension updates. Updates specific to each extension installed in a Joomla! installation can be ignored. These updates will no longer be shown as open extension updates in the page overview.
In the complete extension list, however, the update is still offered and can be installed at any time. The full extension list also offers the possibility to deactivate the ignoring of updates at any time.
Security Audits
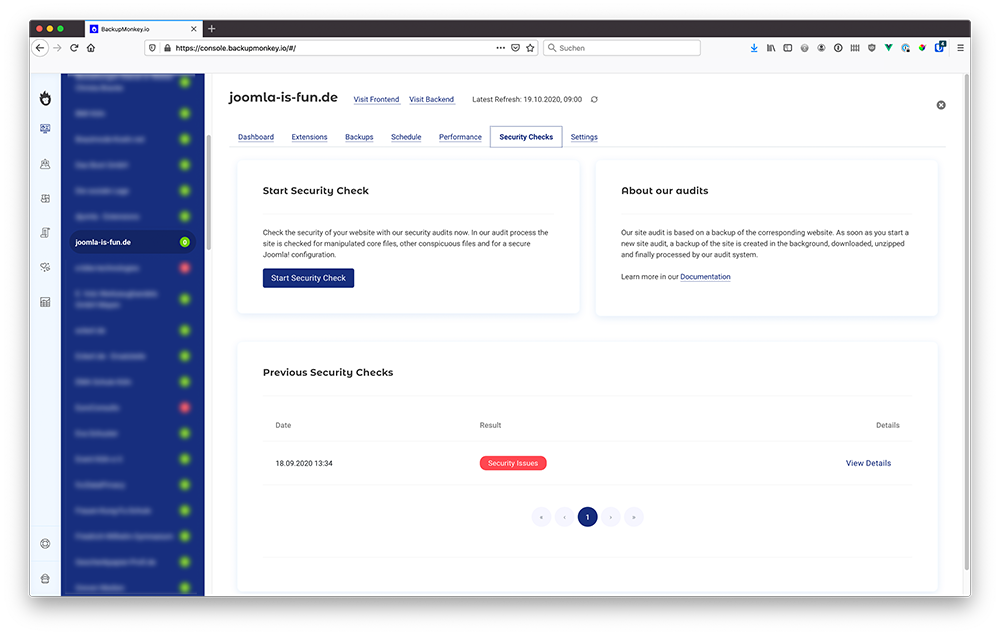
BackupMonkey provides the ability to perform an unlimited number of security audits for connected sites to continuously ensure the integrity of the site.
The function to create new audits or a list of results of already performed audits can be found in the site detail panel in the tab "Security Checks".
Start a new Security Check
To start a new security check, simply click on the "Start Security Check" button. Afterwards our hard-working monkeys get to work. This can take a few minutes depending on the size of the page.
How it works
In order for our test to provide the most up-to-date and reliable results possible, the first step is to automatically create a backup of the website. The normal backup process of AkeebaBackup will be used for this. This backup serves as a basis for the actual audit.
Afterwards the backup is processed in our test programme. Like all processes the site check is done asynchronously, so you can easily continue maintenance work on other sites while the site check is running in the background.
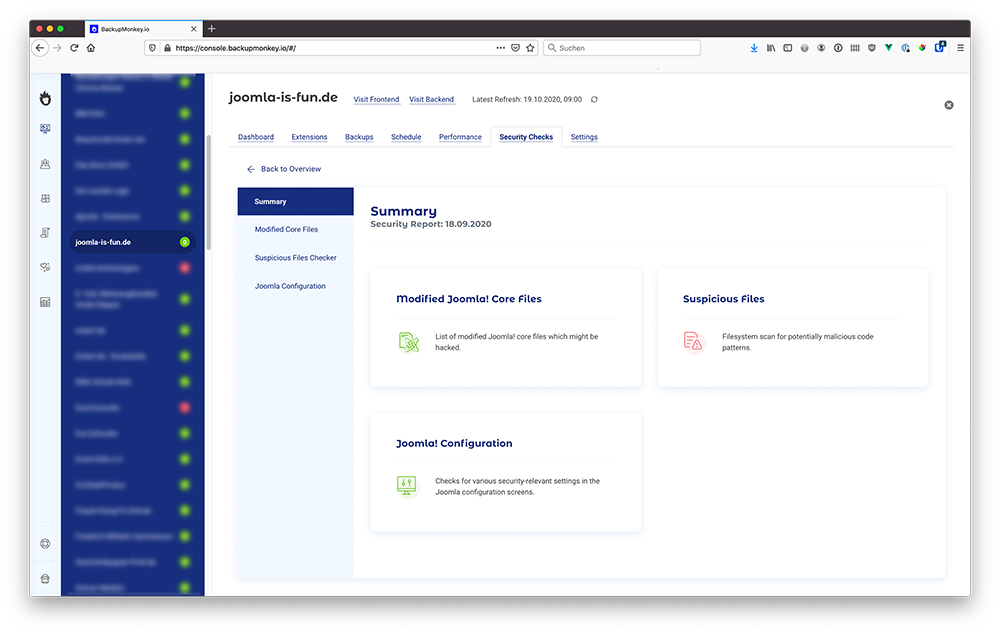
What is tested?
1. Check for modified core files
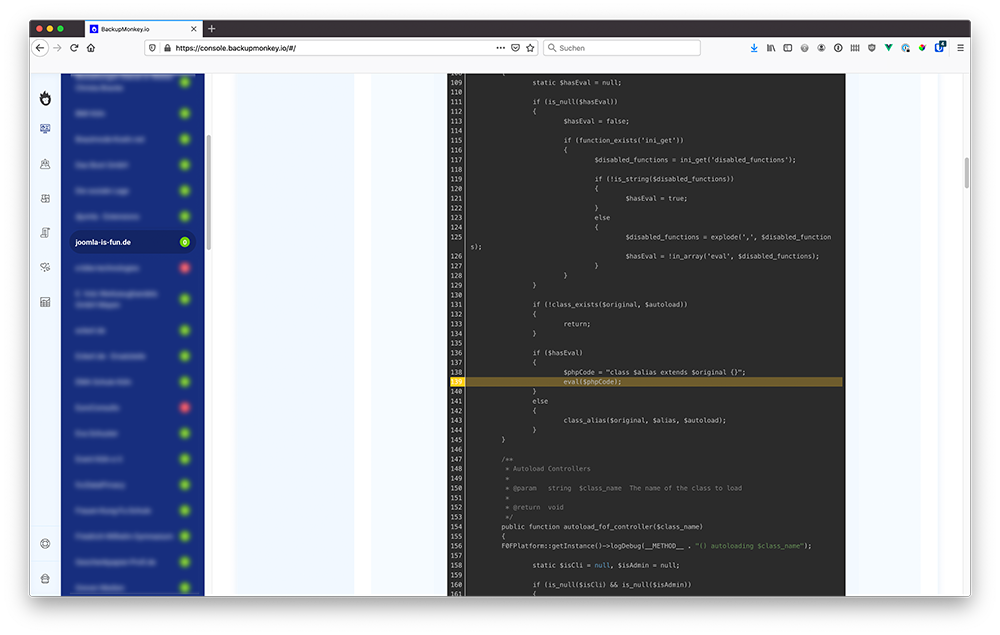
Our test programme checks the core files of the Joomla! installation for any suspicious occurrences. If core files have been manipulated, the corresponding files are listed. With the help of code highlighting, the affected files and code blocks can be checked directly in the BackupMonkey admin panel.
2. Check for suspicious files / code patterns
Our test programme checks all files for conspicuous code patterns that could represent a security issue. This includes for example:
- Code used to hide malicous commands
- Code used to load and execute malicious commands from external sources
- Code used for mass mailings and spammings
- Code used to read malicious commands from i.e. from Cookies or image meta data
3. Check of the Joomla configuration for possible security issues
A check of the Joomla configuration with regard to simple errors, which must be avoided in order not to endanger the security of the website unnecessarily. The following settings are checked:
- Check if the debug mode is deactivated
- Check whether the FTP mode is disabled
- Checking the session length to ensure it is appropriate
- Check if a Captcha is deposited to avoid spam
Results
As feedback, you will receive an answer as to whether there is a potential risk or not:
No Security Issues: All three tests (modifierite Joomla! core files, suspicious files and Joomla configuration) are passed
Security Issues: One of the three tests (modifierite Joomla! core files, suspicious files and Joomla configuration) is failed
Please note that each negative test result requires a manual check. Our tool is designed to make your work easier by allowing you to check pages quickly and cost-effectively without much effort.
Batch Processing
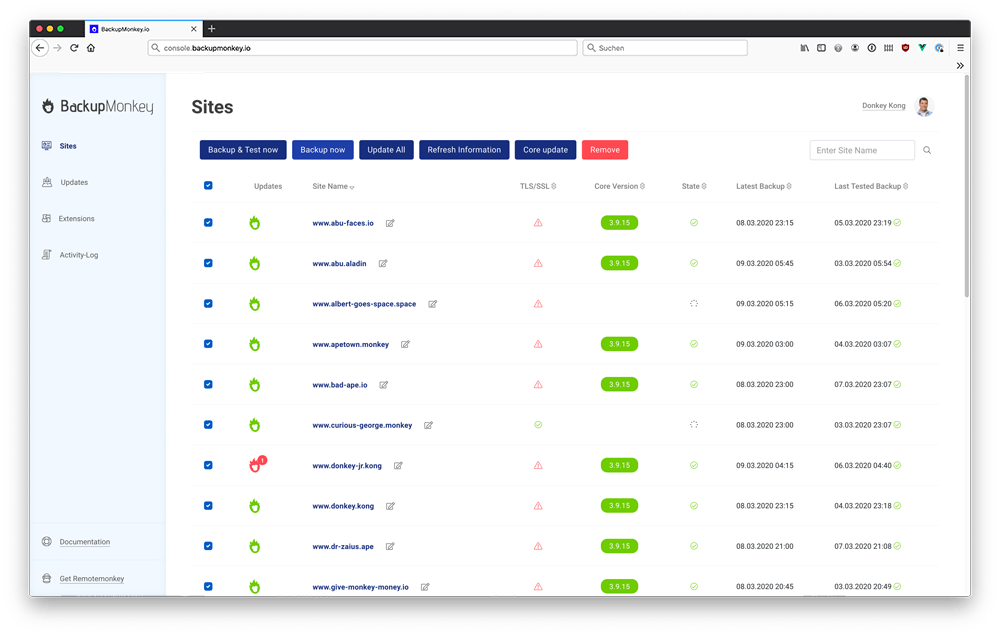
BackupMonkey makes it possible to manage a large number of pages simultaneously by batch processing. For this purpose, the desired pages / extensions must be selected in the overview. The available mass operations are then available above the list.
The following operations are available for managing pages:
- Backup & Test: Create a backup of the selected pages and then tests it for functionality
- Backup Now: Create a backup of the selected pages
- Update all: Triggers all available extension updates of the selected pages
- Refresh Information: Updates the page information retrieved for all selected pages
- Core Update: Triggers all available Joomla! core updates
- Remove: Delete all selected pages
Monitoring
Site availability
We monitor connected sites in 1 minute intervals and notify you by email if a site is no longer available. We will also notify you when the page is available again and provide information about how long the page has been offline
SSL/TLS
In the case of an existing certificate, we display the validity period in the interface of the page, as well as in the overview.
Time to first byte (TTFB)
Our Time to first byte overview shows the response time of the website over a period of 30 days. This makes it possible to monitor peak loads and any changes and to intervene if problems occur.
Maintenance reports
Introduction
Often, end customers have little or no technical know-how.
For this reason, the term maintenance in the context of the Web often seems incomprehensible and is therefore met with dislike. A maintenance report breaks down this construct and clearly explains which services are included in the maintenance offer and what added value they offer.
Make your services transparent to your customers with our automatically generated monthly maintenance reports. The abstract concept of maintenance thus becomes tangible even for customers without a technical background.
Customization
All setting options for individualizing maintenance reports can be found under the menu item Report Editor.
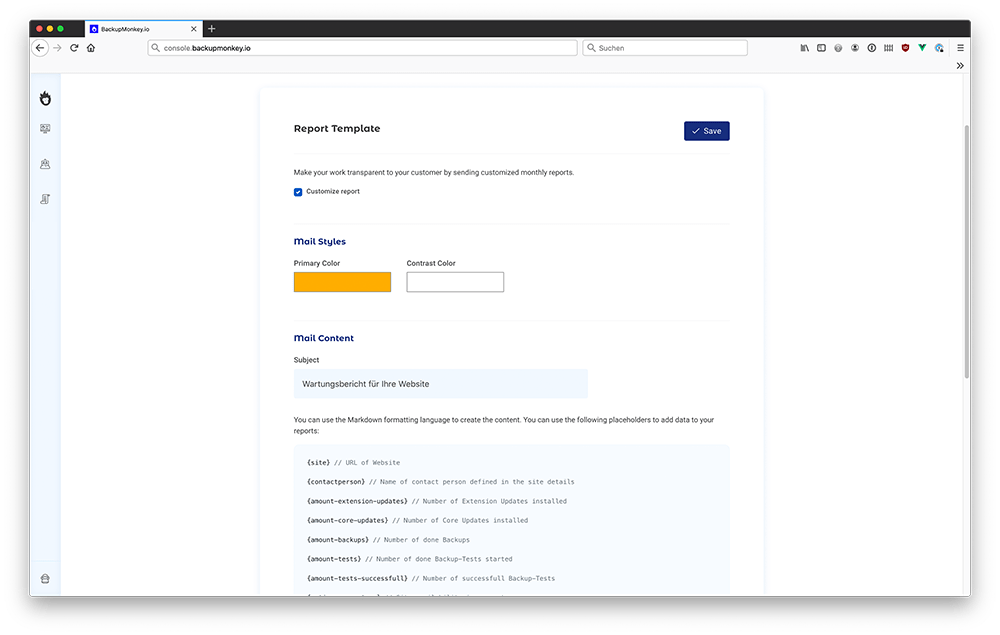
Create maintenance reports as individual as your company. Define a global mail template once and automatically send reports to all desired customers. With the help of a markdown editor and page-specific placeholder texts, you have the possibility to write your individual maintenance report.
It is also possible to store an individual company logo and define primary and contrasting colours. Thus the maintenance report appears in your corporate design.
Placeholder in the overview:
{site} // Website-URL
 {contact-person} // Salutation and name of contact person
 {amount-core-updates} // Number of completed Core Updates
 {amount-extension-updates} // Number of extension updates
 {amount-backups} // Number of backups started
 {amount-tests} // Number of backup tests started
 {amount-tests-successfull} //Number of successful backup tests
 {uptime-percentage} // Site availability in percent (monthly average).

		{extension-update-list} // Detailed list of applied extension updates

		{year} // Year of Report

		{month} // Month of Report

		{last-day-of-month} // Last day of month of report
Quick start? Use our report template as a basis for your own report:
##Your monthly maintenance report
 Hello {contactperson}

 We would like to inform you about the maintenance work on your site {site} that we have done for you in the last month.

 ##Activities
 CMS-Updates:{amount-core-updates}
 Extension-Updates: {amount-extension-updates}
 Backups: {amount-backups}
 Backup-Tests: {amount-tests} (thereof successful {amount-tests-successfull})

 ##Availability
 Site availability: {uptime-percentage}%

 Kind Regards,
 COMPANY NAME
Contact persons and e-mail
For each page you can individually define a contact person and an e-mail address to which maintenance reports should be sent. Both information can be found in the page configuration (Report-Settings).
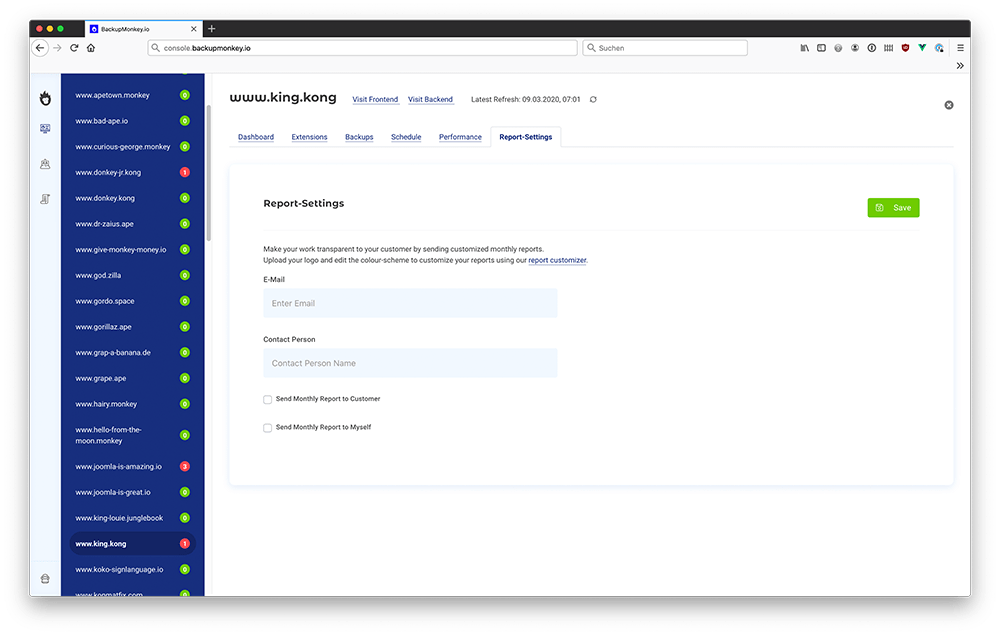
We recommend using a combination of salutation and name of the contact person to allow a general address in the globally defined text of the maintenance reports.
BackupMonkey-Toolbox
BackupMonkey-Toolbox offers partly exclusive discounts on popular Joomla! extensions and services. Moreover, it also offers sales and information material around Joomla!
Discounts are available for the following services:
- AcyMailing (20% Discount)
- Akeeba Backup Pro (30% Discount)
- Digital Peaks - Extensions (25% Discount)
- Easy Contracts (25% Discount)
- Easy Rechtssicher (25% Discount)
- J!Training Joomla! - Seminars (20% Discount)
- Kicktemp Extensions (25% Discount)
- PWT Extensions (25% Discount)
- RSFirewall! (30% Discount)
- RSFormPro! (30% Discount)
- Techjoomla Extensions (15% Discount)
Troubleshooting
Backup failed
AkeebaBackup Pro is not installed
Since AkeebaBackup 7.0 (Akeeba-Statement / Dec. 2019) the Akeeba remote JSON API is no longer part of the AkeebaBackup core version. Accordingly, from Akeeba 7.0 on the Pro version is required to use the backup functions of the BackupMonkey. For installations where only the core version of AkeebaBackup is installed, it is unfortunately not possible to start or test backups.
Backup-Test failed
AkeebaBackup is configured incorrectly
Typical problems here are e.g. wrongly set storage paths, too large file sizes for the generated backup files or too long runtimes.
In this case please check the configuration of AkeebaBackup in the administration interface. It is also recommended to restart the Configuration Wizard of AkeebaBackup to minimize possible error sources.
Core update failed
The typical reason is that you have a .htaccess that doesn't allow access to a file we are using for the update process, we need direct access to
Joomla 3.X: components/com_remotemonkey/restore.php
Joomla 4.X: components/com_remotemonkey/extract.php
If you are using the htaccess maker from admin tools you can just copy "components/com_remotemonkey/restore.php" / "components/com_remotemonkey/extract.php" in the section Execptions/Allow direct access to these files and it should work.
Extension update failed
Subscription key is missing / has expired
Failed extension updates for paid extension are often related to missing or expired subscription keys.
Please check in the administration interface of the website whether a valid extension key has been deposited.
Extension does not support the Joomla! updater
Some extensions do not support the normal Joomla! updater. In this case, extension updates must still be installed manually via the administration interface.
These include, for example:
- Extensions of the manufacturer Joomlart
Temporary server issues
It can happen that the respective server system on which the page is hosted is not reachable due to short-term service interuptions or is not able to process the corresponding task. Typical malfunctions are maintenance by the host and downtimes, overload of the server due to visitor peaks or problems with the internet connection.
BackupMonkey can't connect to site due to htaccess protection
To avoid problems with the htaccess-file you can simply whitelist our IPs in your htaccess-file:
		IP-List:

		178.63.68.234

		2a01:4f8:121:138f:a0::1

		88.198.57.28

		2a01:4f8:222:1ca:a0::1

		88.198.57.29

		2a01:4f8:222:1ca:a1::1

		178.63.68.235

		2a01:4f8:121:138f:a1::1
		Preview htaccess

		Order deny,allow


		Deny from all


		Allow from 78.63.68.234

		Allow from 2a01:4f8:121:138f:a0::1

		Allow from 88.198.57.28

		Allow from 2a01:4f8:222:1ca:a0::1

		Allow from 88.198.57.29

		Allow from 2a01:4f8:222:1ca:a1::1

		Allow from 178.63.68.235

		Allow from 2a01:4f8:121:138f:a1::1

		Allow from 213.160.73.133

		Allow from 127.0.0.1

		allow from 2a00:17d8:100::2591


		AuthName "Passwortgeschützter Bereich"

		AuthUserFile /Your/Directory/Here

		AuthType Basic

		Require valid-user

		Satisfy Any
Page is reported offline although it is online.
To check the availability of integrated pages we use the external service UptimeRobot. Some hosters block the service, resulting in erroneous feedback. In this case you can try to reach your hoster.
Hosters known to us with the problem: all-inkl
You're facing similar issues with different hosters?
It would be great to drop us a line, so that we can always keep the list up-to-date. Simply write us at
Invoice & Subscription
At the end of the 30-day trial period, your account automatically converts to a paid subscription.
Currently credit card and SEPA payment are supported.
Billing
The service fees are invoiced monthly.
In the administration interface, you can also view the monthly costs that you expect at the end of the month at any time. In addition, you will find an overview of the services provided, on the basis of which the costs are made up.
Billing takes place at the end of each month. In this case, your account is automatically debited with the invoice amount due on the 1st of the following month.
After the end of the test phase, the basic fee for maintenance packages (BackupMonkey-Basic & BackupMonkey-Plus), as well as for automation packages will be charged proportionately for the current month.
Cancellation
Your subscription to BackupMonkey.io can be cancelled at any time, giving you complete flexibility. In the event of cancellation, your subscription ends at the end of the month. Any basic fees are payable in full for that month and will be invoiced as usual on the 1st of the following month.