In the second part of the series, we explain the basic steps in building a template and dive into the exciting world of template overwrites.
Content
- What we will build
- Create the basic structure of the template
- index.php
- template-details.xml
- language-files
- Create content structure - Administrative work
- Categories
- Create articles and contacts
- Create menu items
- Build & style content pages
- Cases
- Case
Agency website for WebGorillas - a fictional web agency
After we have worked together on the basic structure of a Joomla! template and the functions of the individual files in the first part of the tutorial, we would like to use and consolidate what we have learned and create the portfolio website for a fictional web agency.
As is familiar from many websites of this kind, it consists primarily of the following content:
- A homepage which provides a quick overview of the services offered and reference projects
- A projectoverview in which the various case studies are displayed similar to a blog
- Projectpages, which provide detailed information on individual case study projects
- A teampage, where the individual teammembers are introduced
You can find the design to be implemented here: https://www.figma.com/proto/TmeIWSna4djAXavnsPSPo8/Monkey-Template?page-id=0%3A1&node-id=1%3A248&scaling=min-zoom
In the second part of our series, we will first look at the Cases page and the project detail pages, before we deal with the remaining pages in the third part of the article series.
In order to be able to implement the desired layout in the form of a Joomla template, we will make use of the complete flexibility of Joomla templates and present all the techniques you need to develop professional Joomla templates for your clients.
Attention: Of course, in this tutorial we can only cover some topics superficially and not in detail. We show the basic systems of templating: template overwrites, language strings and the flexible use of custom fields. Based on what you have learned, it is then possible to go deeper into the subject without any problems. Of course, we as a team are always available to answer specific questions.
The basic structure of our template
The first step is to convert the delivered design into an abstract template structure in which the necessary positions for modules and our component output are defined.
Under the following link you will find an overview of how the page should be structured later:
The markup of the page: index.php
First, we start with index.php and write the markup of our page. At the places in the code where modules or our component outputs are to be displayed later, corresponding placeholders are placed in the code.
Header
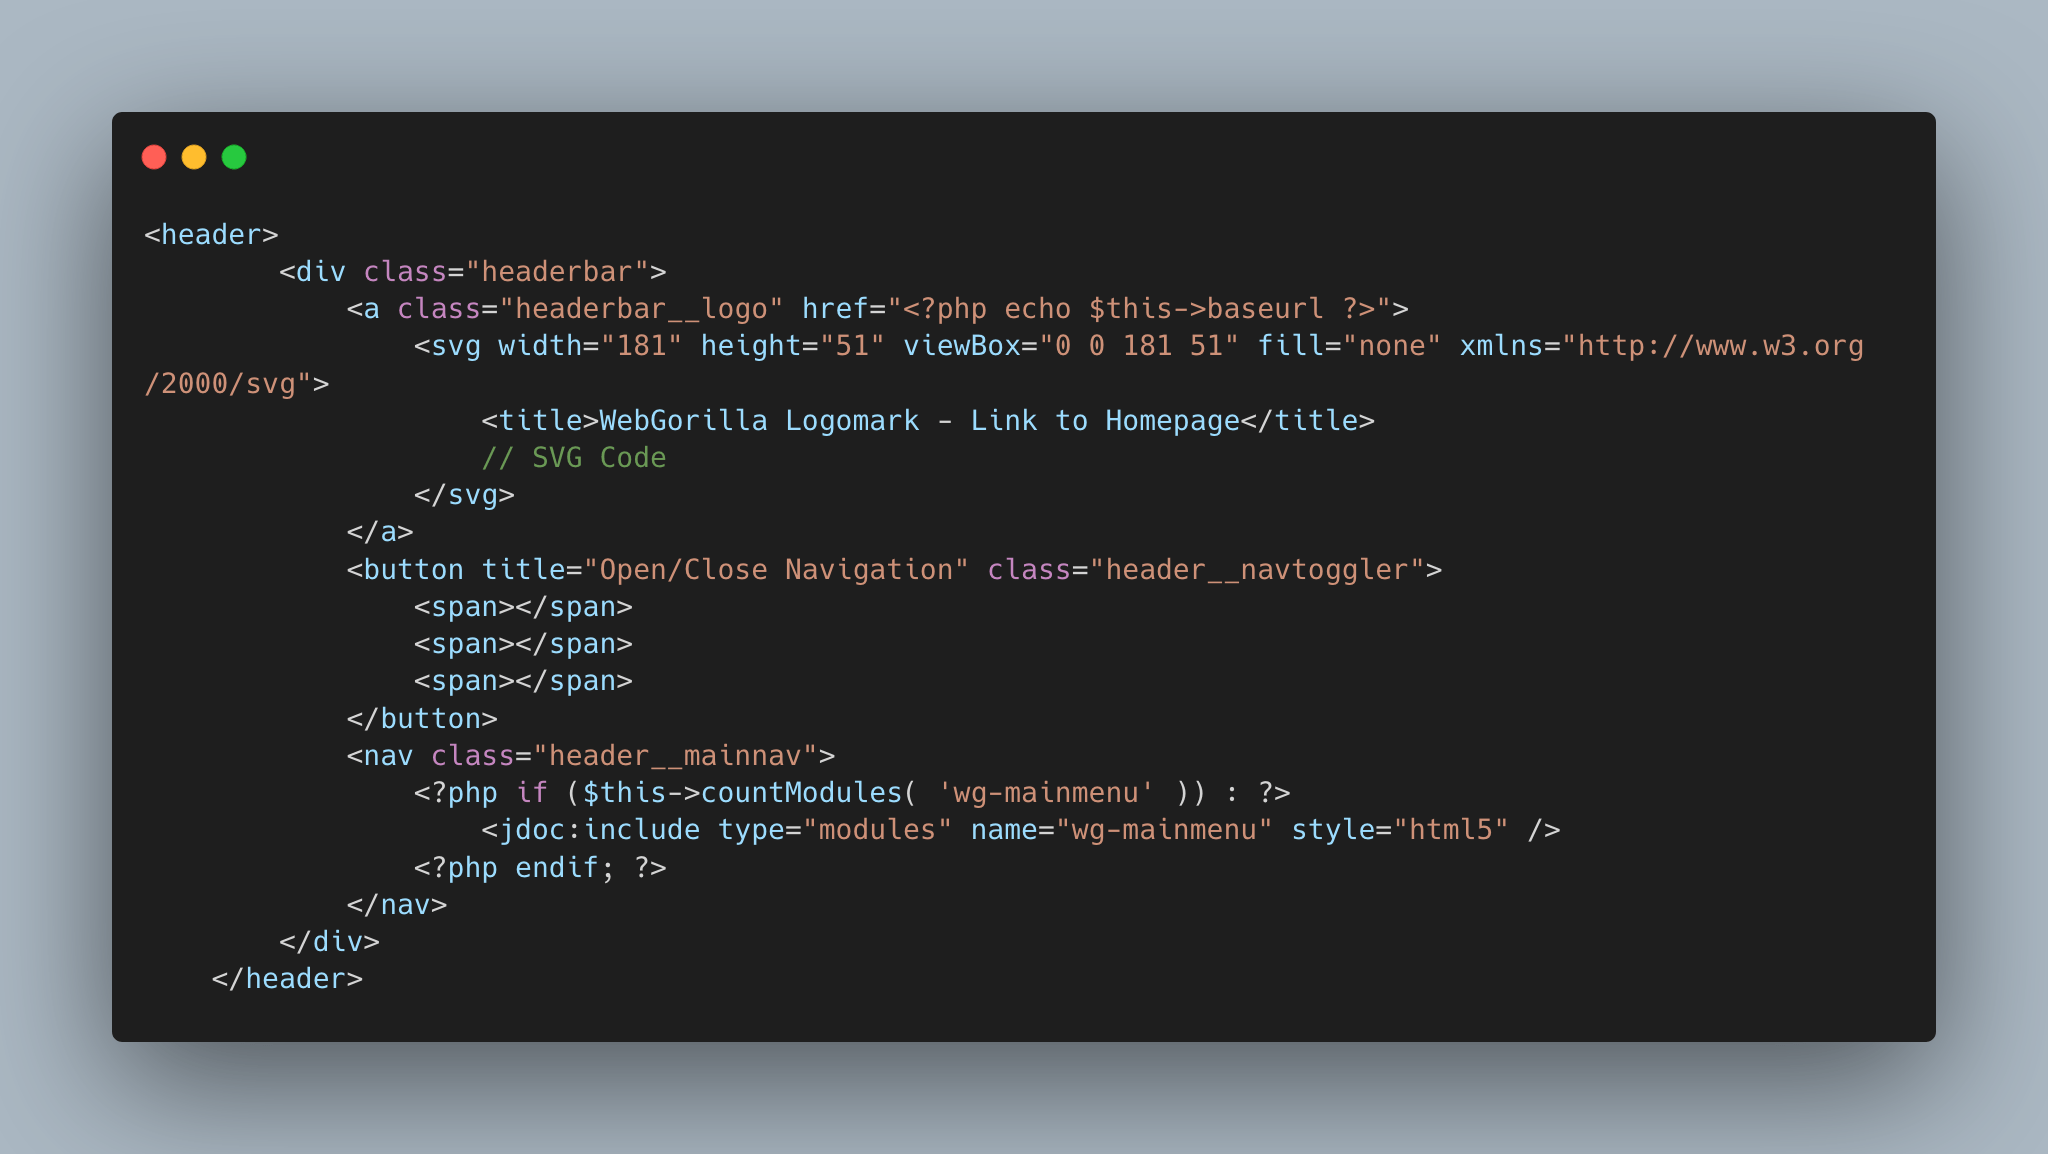
The header area of our page is quickly built: In addition to the logo, which is embedded as SVG code in the HTML code, we also add a button that controls the position of the off-canvas navigation on mobile devices as well as the actual main navigation.
The button to control the offcanvas display contains 3 empty <span>-elements, which are then styled using CSS.
Main
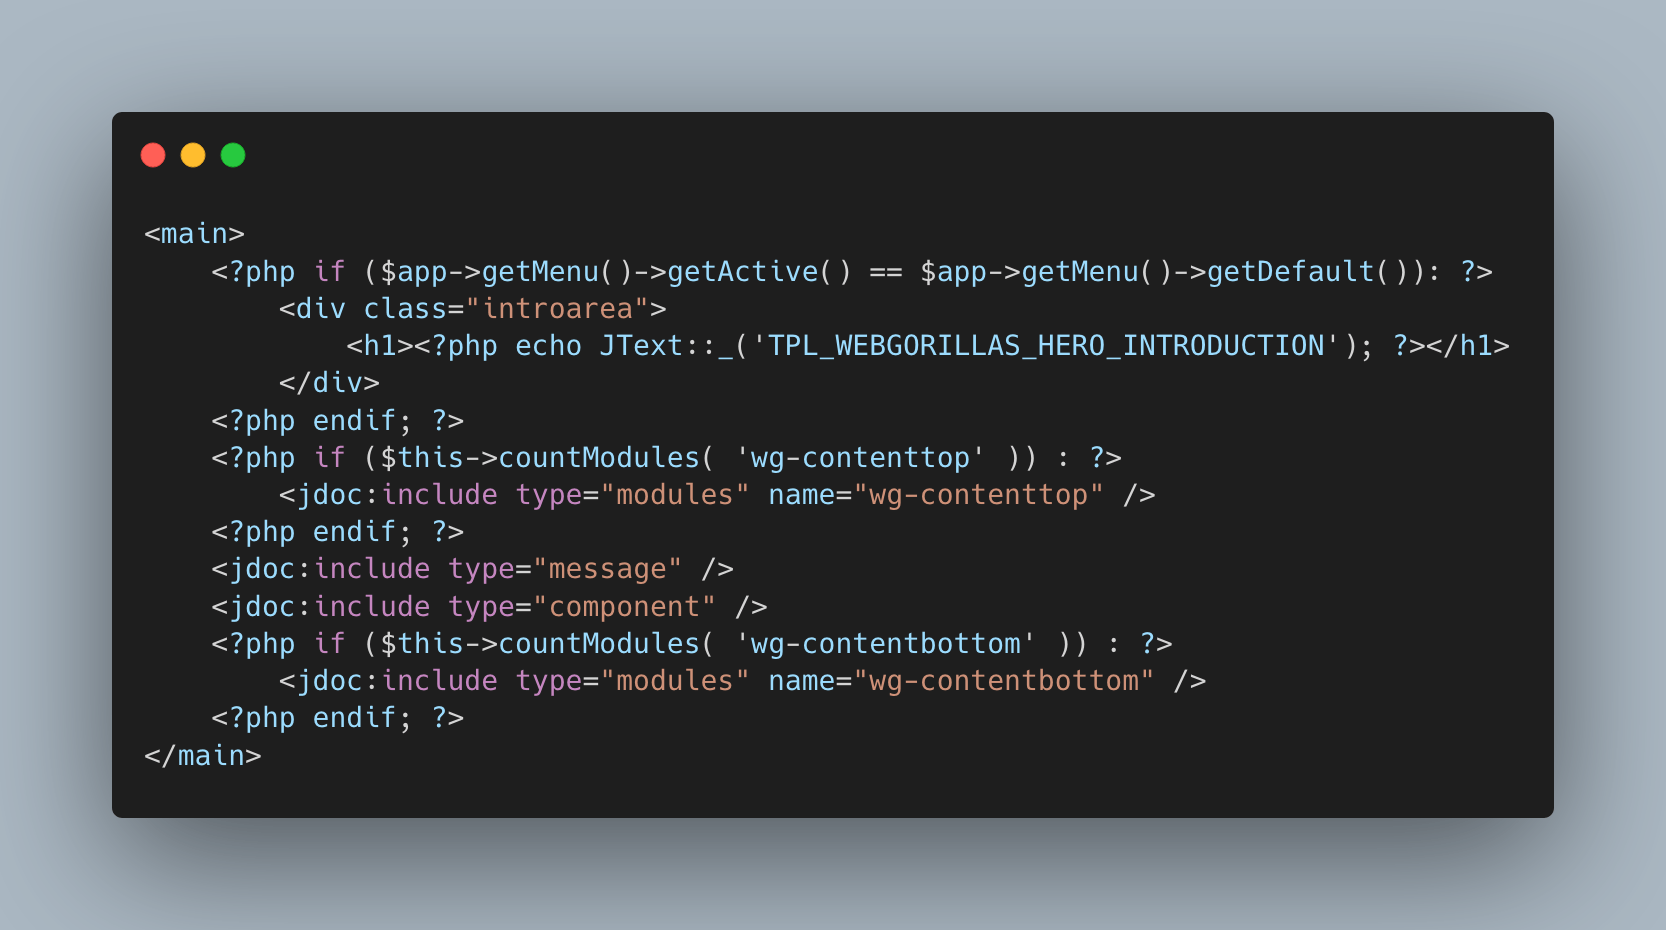
The primary content area of our page is also very slim and consists of two module positions, the component output and the introduction area, which is to be shown exclusively on the start page. For this purpose, we have integrated a small homepage detection that ensures that the "introarea" area is only displayed on the start page.
The text to be shown as intro text is stored in form of a language string. More on this later.
Although the module position "wg-contenttop" is not needed at the current time, it has proven useful in practice to place a module position above and below the component output, as this brings more flexibility in the design of content.
Footer
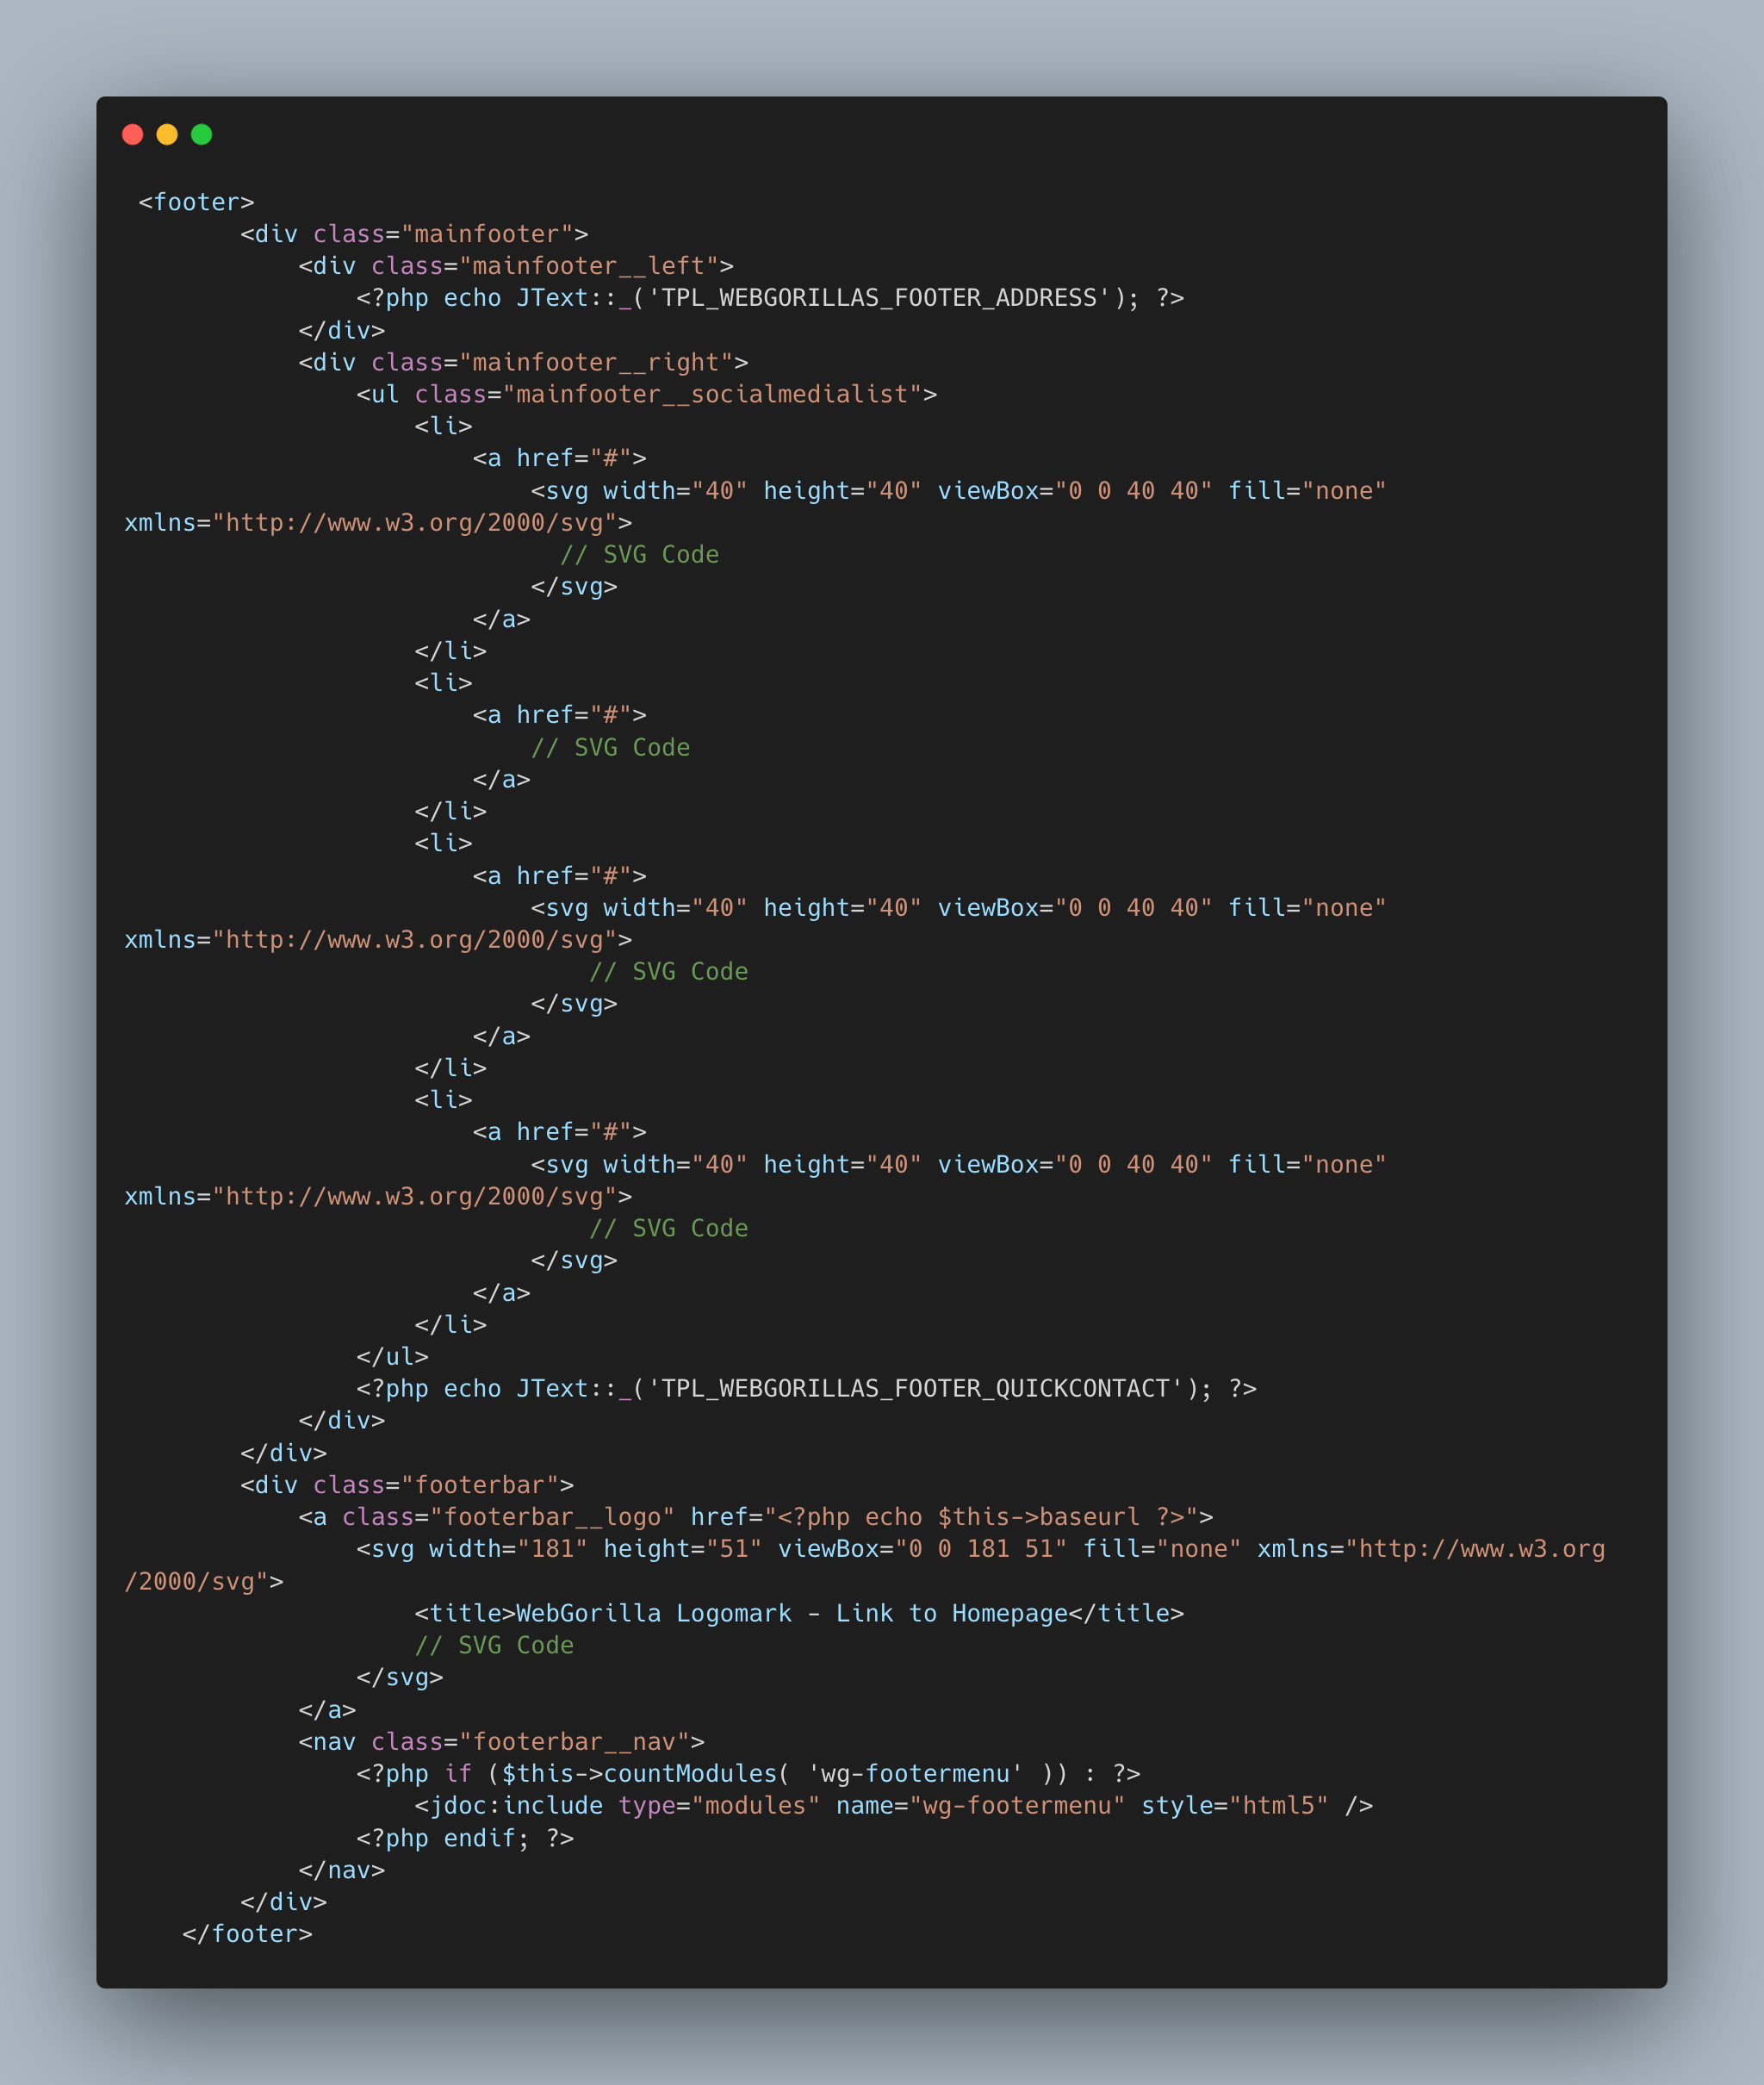
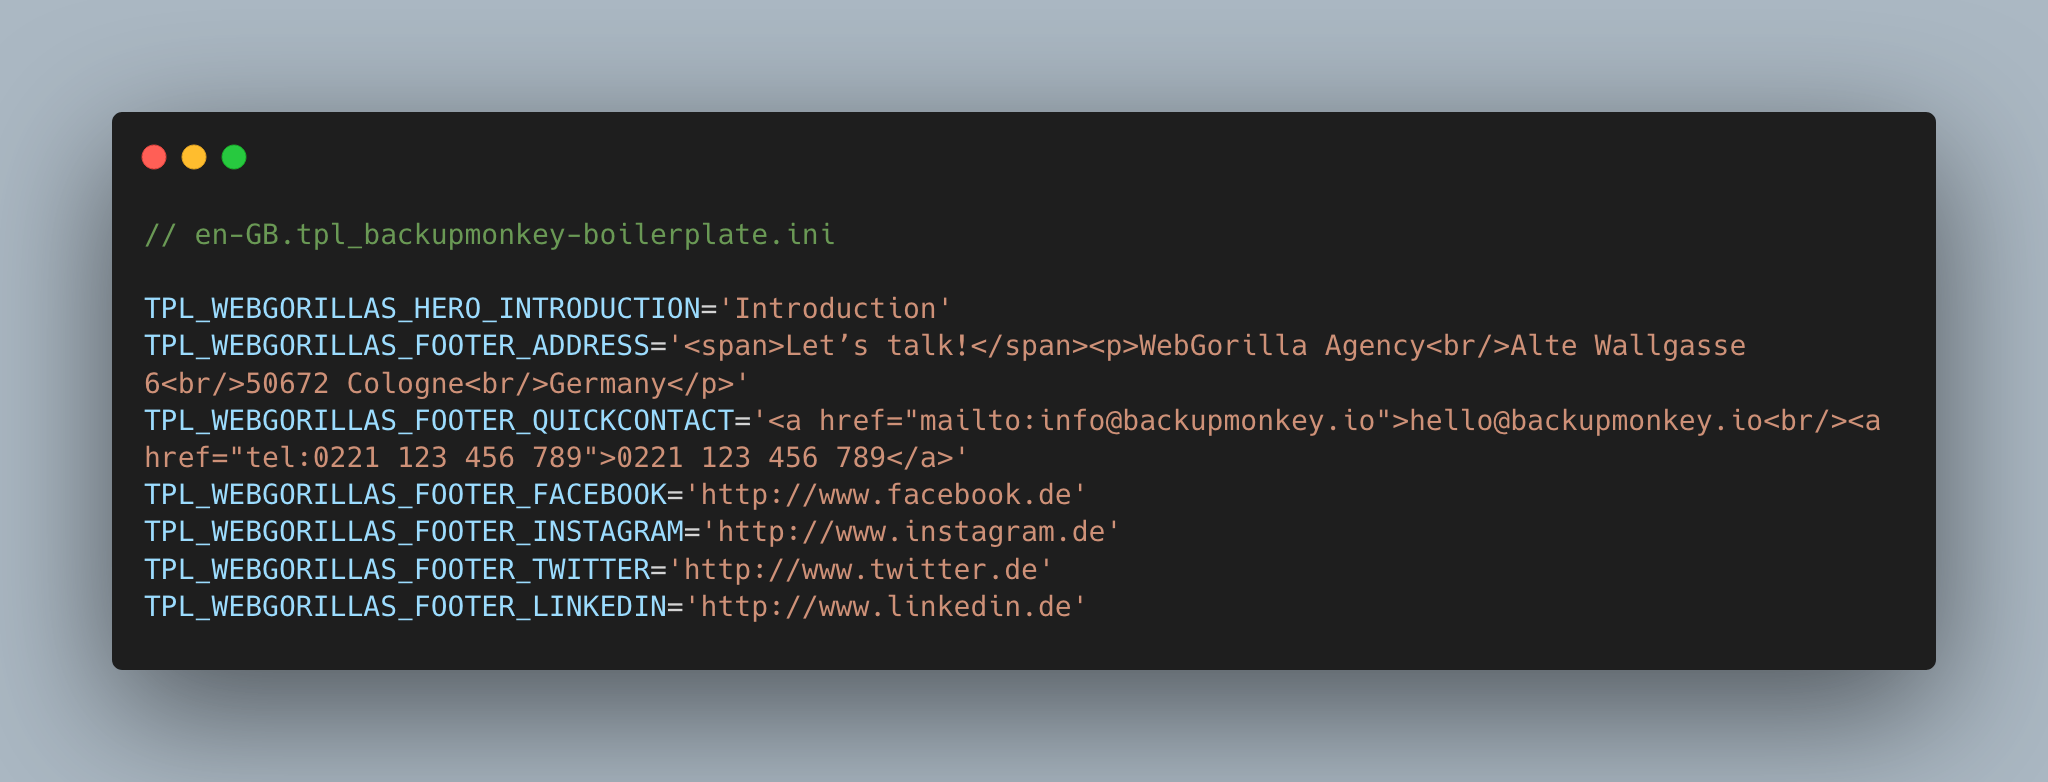
In the footer area of the website, we place the links to the various social media. The actual links are stored as language strings so that they can later be maintained separately for all languages as language overwrites for customers. The same applies to the contact and address data. In addition, we have the possibility to store meaningful fallbacks in the language files of our template, as long as no overwrites are set via the administration area of the page.
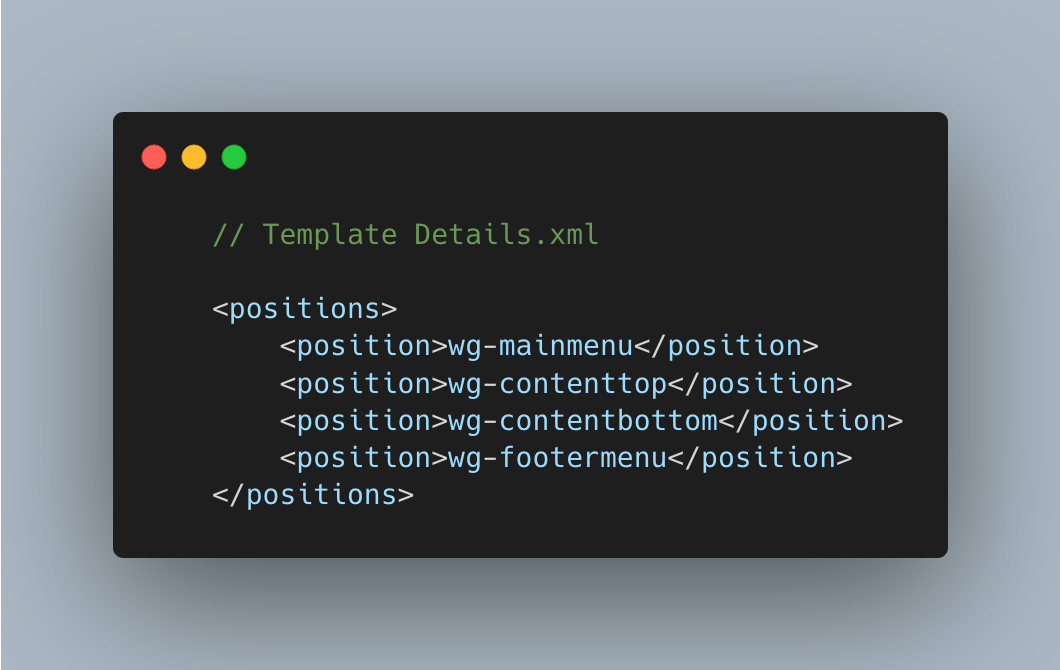
templateDetails.xml - Add module positions
In the next step, we add the module positions that we have defined in the index.php of our template to the defined positions in the templateDetails.xml of our template. This way, they can be selected in the administration area of our site.
Language-Files - Store language strings
With the help of language files, language strings can be added to our template. These language strings can then be overwritten in the administration area of the site and are thus maintainable for customers..
You can find out how to create language files here: https://docs.joomla.org/Location_of_template_language_files/en
Within the language files, text contents can be assigned to variables, which then replace the placeholders in our code.
Summary Part 1: The basic structure of the template
Finally, we have built the basic structure of our template and in the next step we are able to fill our website with content and then style it with the help of CSS and JavaScript and add interactivity to the page.
What we have already managed to do so far:
index.php: Implement the desired markup using placeholders for modules, the component output and some language strings that can later be customised as language overwrites.
templateDeatils.xml: Integration of the created module position in the "positions" area, so that they can later be selected as module position in the administration area of the page.
The next step: Create content structures
In order to be able to work properly on the styling of our template, we will create the content structure for our website in the second step.
With the help of Custom-Fields we do not need any extensions for this, but can do the complete layout of the content with Joomla! core features and the excellent overwrite system.
To do this, we create the following content structure:
- Services - Presentation of the services as an overview on the start page
- Cases - Presentation of projects in well arranged grid, slider on start page
- Blog - display of the three most recent blog posts on the start page
Within these categories, we create an appropriate number of posts, which allows us to test our styling specifications properly.
Creating custom fields
Custom fields can be used to add any additional information to content (e.g. a post or a contact). We make use of this flexibility, which we have gained with Joomla 3.7, in order to be able to enter the case studies easily and to place the information in the required places in the layout.
Here is an overview showing how the content structure for project pages should look later on. Content that is managed via custom fields is marked in red. Content that is managed via standard fields is marked in purple.
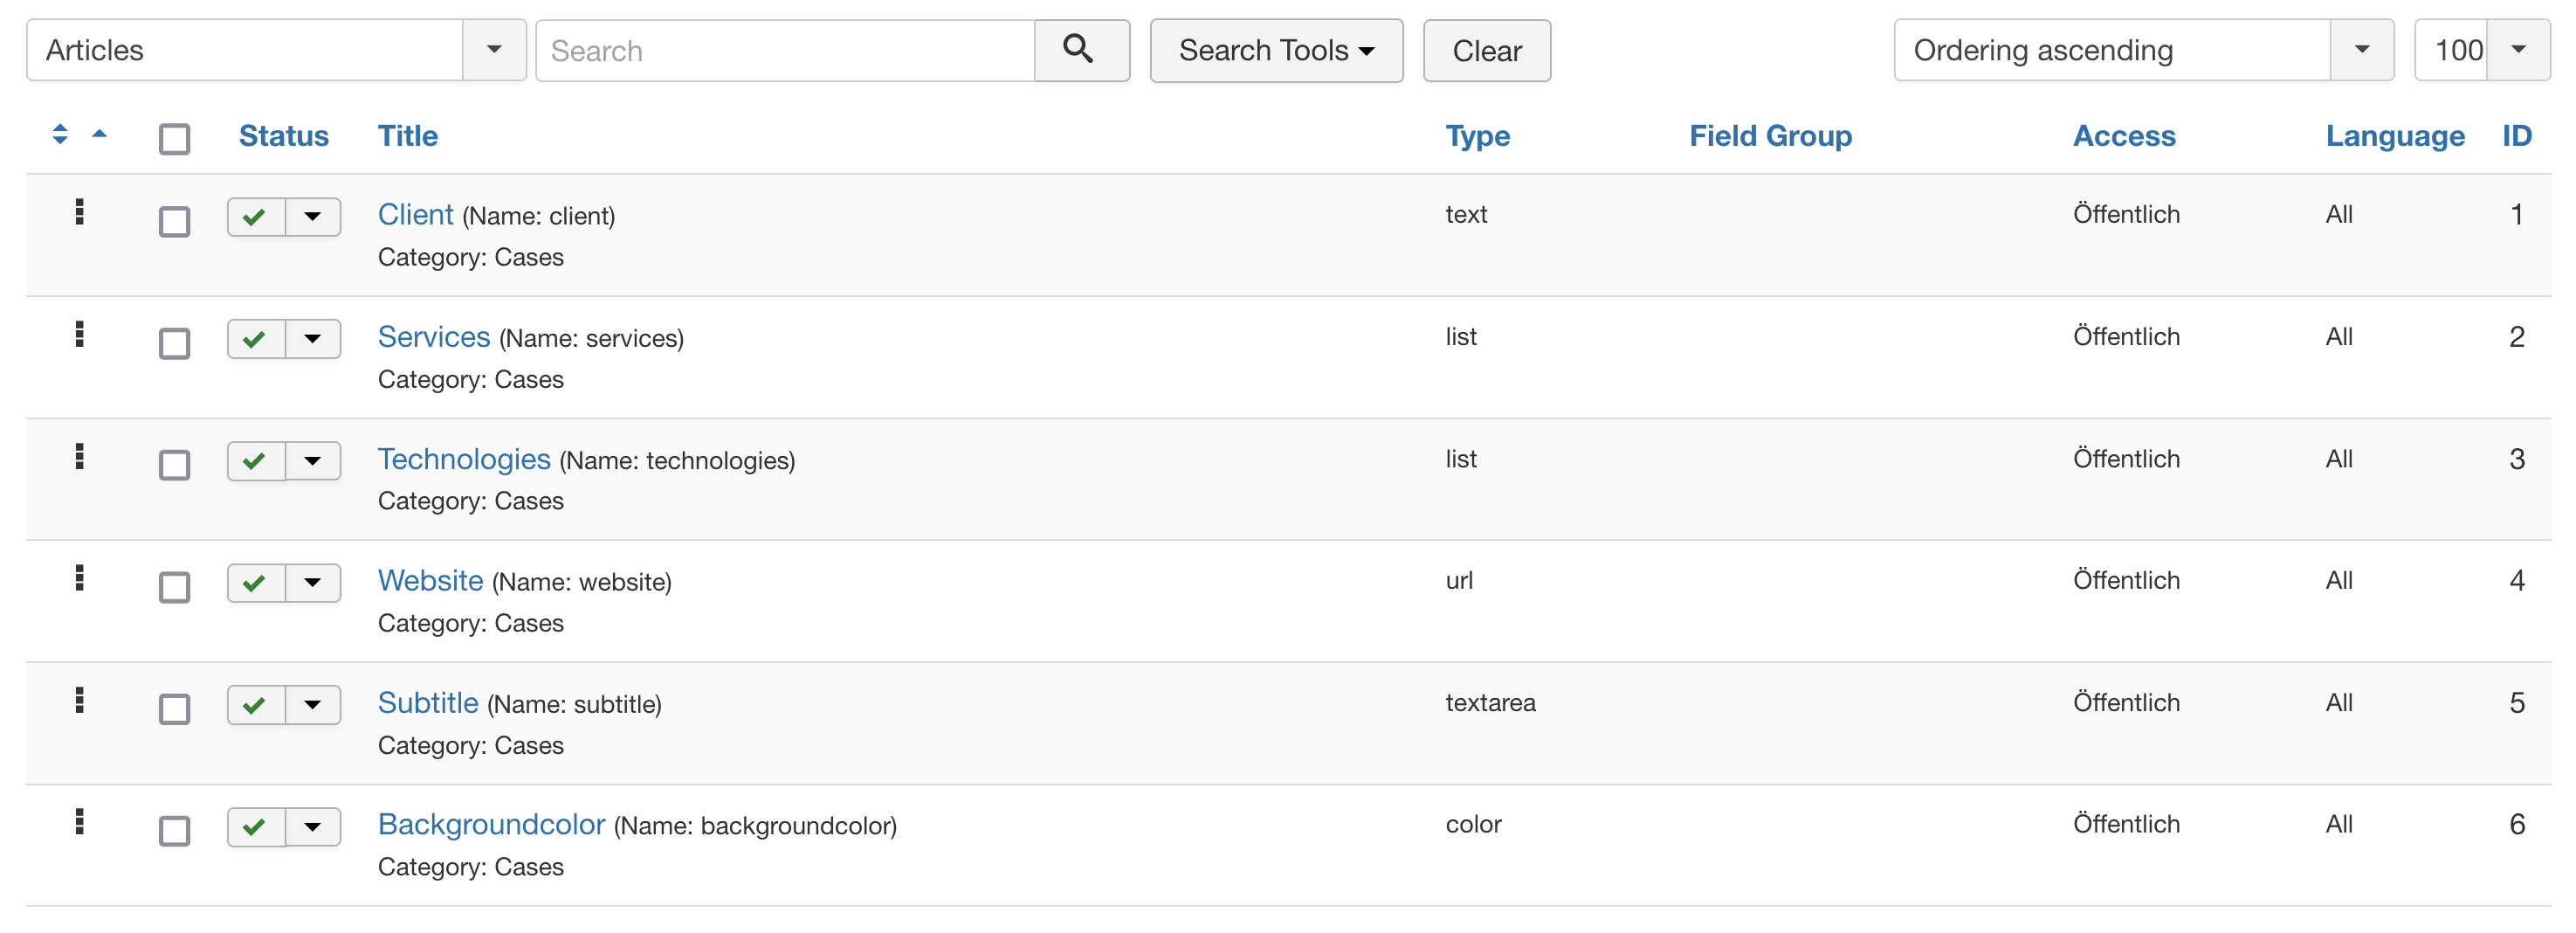
This results in the following fields, which must now be created:
|
Field |
Field Type |
|
Client |
text |
|
Services |
list |
|
Technologies |
list |
|
Website |
url |
|
Introduction |
textarea |
|
Subtitle (shown on project-overview-page) |
text |
In addition, we add two more fields that we will need later to display the slider on the home page.
|
Field |
Field Type |
|
Backgroundcolor |
color |
|
Date |
09 - 2020 |
After that, our field overview in the administration area of the page should look something like this:
Creating articles and contacts
Now that the preparations have been completed, we can create the actual articles and contacts for the team page. No further custom fields need to be added for the contacts, as fields are already provided by the Joomla! core for the desired information (name, position, picture).
Create menu items and add content
Finally, we need to add the content we have just created to menu items. Here we need two different menus (mainmenu and footermenu) with the corresponding menu items:
Mainmenu:
- Home - Category blog (Services)
- Cases - Category blog (Cases)
- Team - List contacts of a category (Team)
- Contact - Single contact (Agency contact)
Footermenu:
Imprint - Individual Contribution
Data Policy - Individual Contribution
Congratulations - the hard work is done! Up to this point we have created the basic structure of our template and created all the necessary (dummy) content to get to the fun part in the next step. Adding styles and interactivity to transform the static graphic designs into an interactive website.
The Fun-Part: Styling and Interactivity
The time has come, our content is up and running, although not very pretty, on our website. If you have followed the tutorial to this point using the sample code from step 1 and your own Joomla! installation, your website should now look something like this:
The fun part: styling and interactivity.

The bad news: The site still looks very basic and unexciting. The good news: we are now going to change that!
The first steps: variables, global styles, cross-page elements
At the beginning of any styling process, the following have proven to be our first steps:
- Create variables (colours, typography, spacing, etc.)
- Define global styles
- Style cross-page elements (e.g. footer)
Once these steps have been completed, one can deal with individual elements on the website and transfer them step by step into the desired layout.
Since it would be too time-consuming and not very useful to discuss and present every single CSS declaration in detail here, we would like to take this opportunity to give you some general tips and tools that have proven their worth in our everyday work at the agency:
- Mobile First!
- CSS custom properties
- CSS grid and CSS flexbox (Excellent guides at CSS tricks)
- BEM as a naming convention for (S)CSS classes
- SCSS-Partials / -Modules for better structuring of styles
- Utility variables for spacing and typography
All styles/scripts can also be viewed in the Github repository of the finished template (to be published with the final article in this series in August). If you have any detailed questions, feel free to contact us on social media or at
Now that we have created the first styles for our template, the next step is to design the individual page elements. Let's go!
The Overwrite System in Joomla: Designing components and modules according to your wishes
Joomla! offers a comprehensive system for customising the standard output of modules and components to your own wishes. This is done with the help of Template-Overwrites.
Since in our experience this is necessary in a large number of projects, it is important to become familiar with this instrument. Once you have understood overwrites, they are a powerful tool for making customer wishes come true.
Here's the Joomla! documentation on template overwrites: https://docs.joomla.org/How_to_override_the_output_from_the_Joomla!_core/en
The way Template-Overwrites works is quickly explained. Within our template directory we can create another folder called "html". Inside this folder we can store a copy of the layout we want to overwrite.
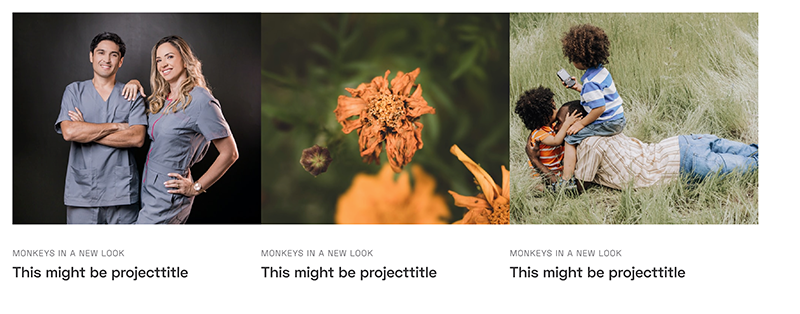
Let's take a look at our example project: On the "Cases" page, the various case st projects are to be shortly introduced in a multi-column grid. The order in which the information is to be displayed is as follows:
- Intro image
- Subtitle
- Title
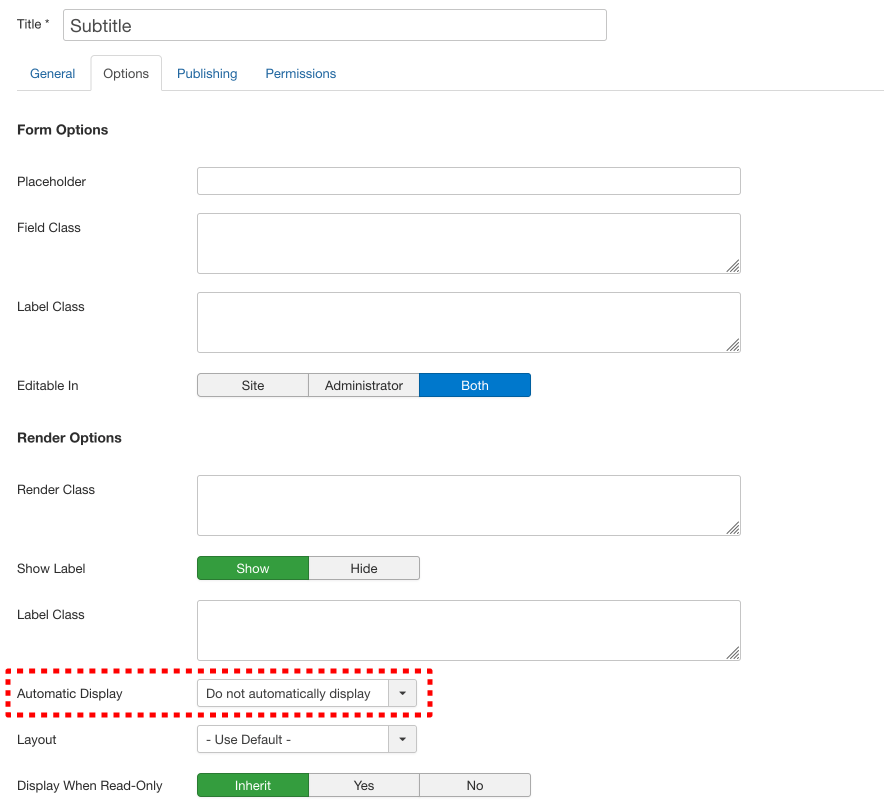
If we compare this with the standard Joomla output (see screenshot), we notice that the order of the information is different and that the subtitle is not (yet) output. We have deliberately switched off the output of the subtitle in the settings of the custom field, as we want to control the positioning and the surrounding markup in our overwrite ourselves.
To make the desired changes to the view for our template, we must now create our first overwrite, in this case for the category blog view (com_content / category).
We could now manually create the individual files from the following directory:
JOOMLABASE/components/com_content/views/category/tmpl/LAYOUTFILE.PHP
copy into our template directory:
TEMPLATE_NAME/html/com_content_category/LAYOUTFILE.PHP
It is easier, however, to do this directly using the administration interface of Joomla itself, which also offers the function of creating template overwrites with just a few clicks.
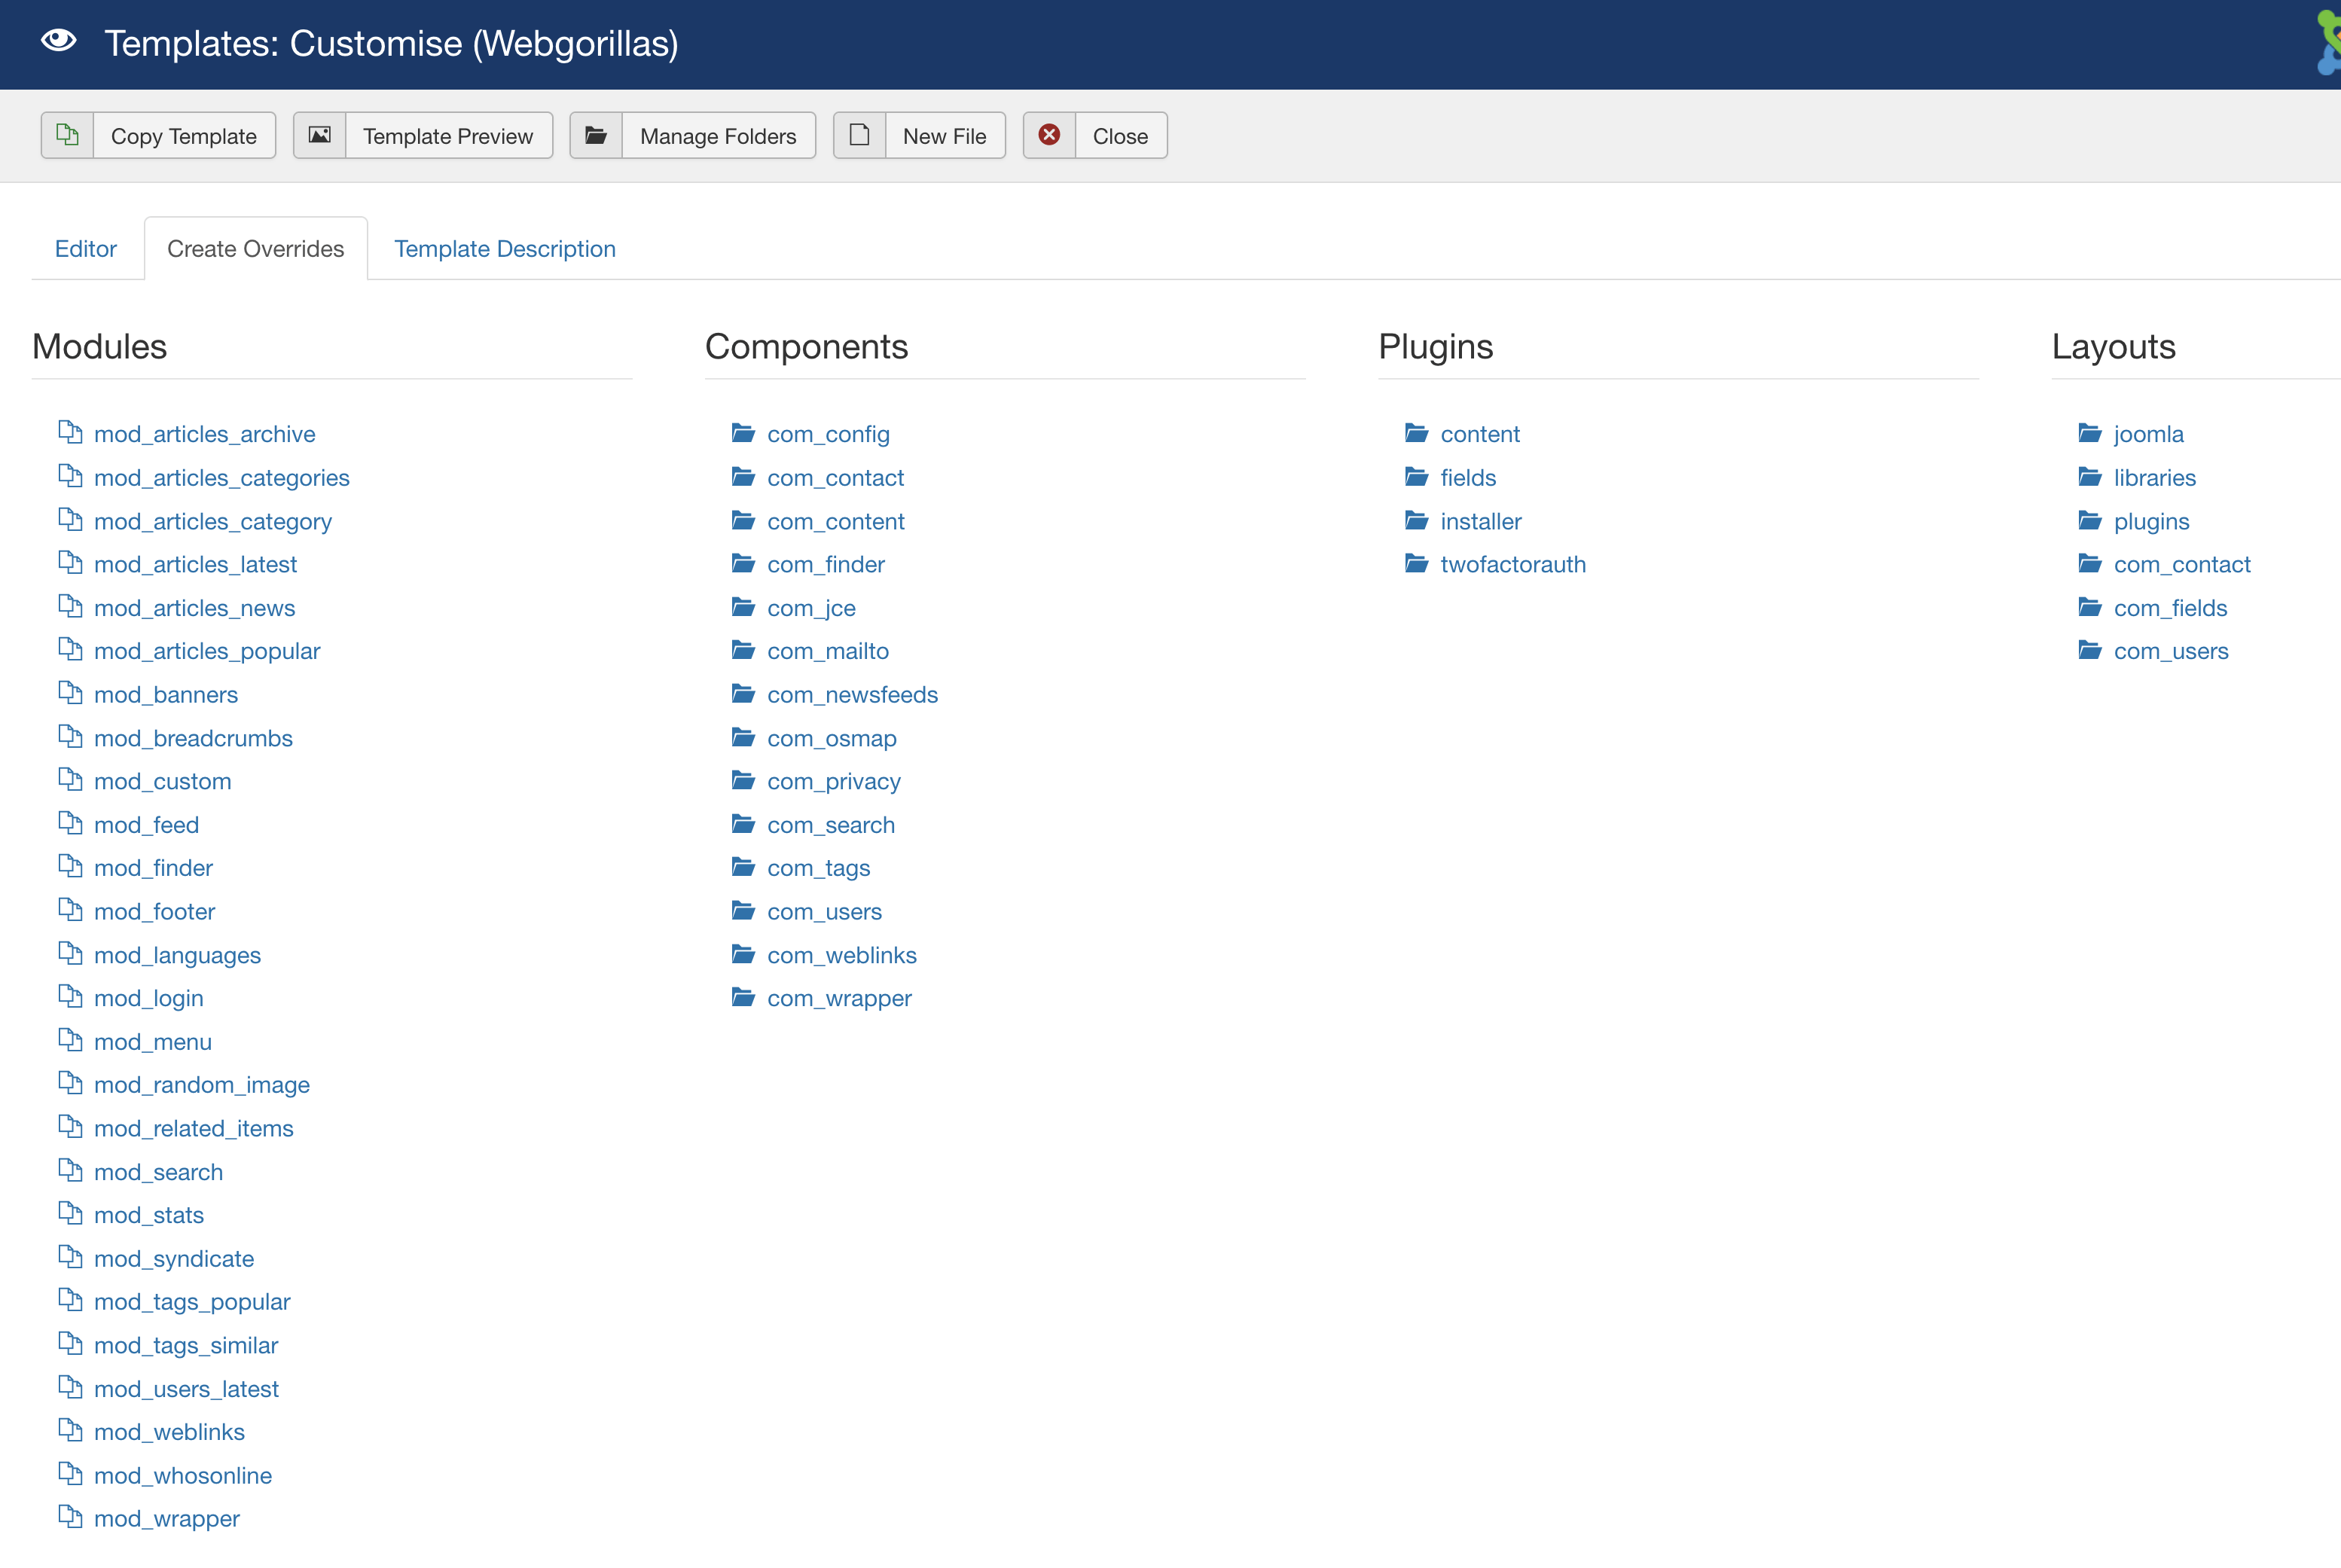
For this, it is sufficient to open the administration area of our template and select the desired component and view (or the desired module) in the tab "Create Overwrites". The required folder structure is then automatically created in our template directory.

Projects at a glance - Category Blog
After we have created the necessary files for our overwrite, we can start the actual work on the code in the next step. Within the overwrite, there are primarily 3 changes that need to be made:
- Adjustment of the content order
- Output contents: $this, $this->item, $this->item-XYZ
- Integration of the subtitle (custom field)
Adjust order of elements:
In the first step, we want to output the title below the intro image as discussed. To do this, we need to swap the order of the placeholders provided for this within the blog-item.php file.
To do this, we are going to copy the code that is responsible for the output of the intro image from line 48 and paste it above the code that is responsible for the output of the title (line 30).
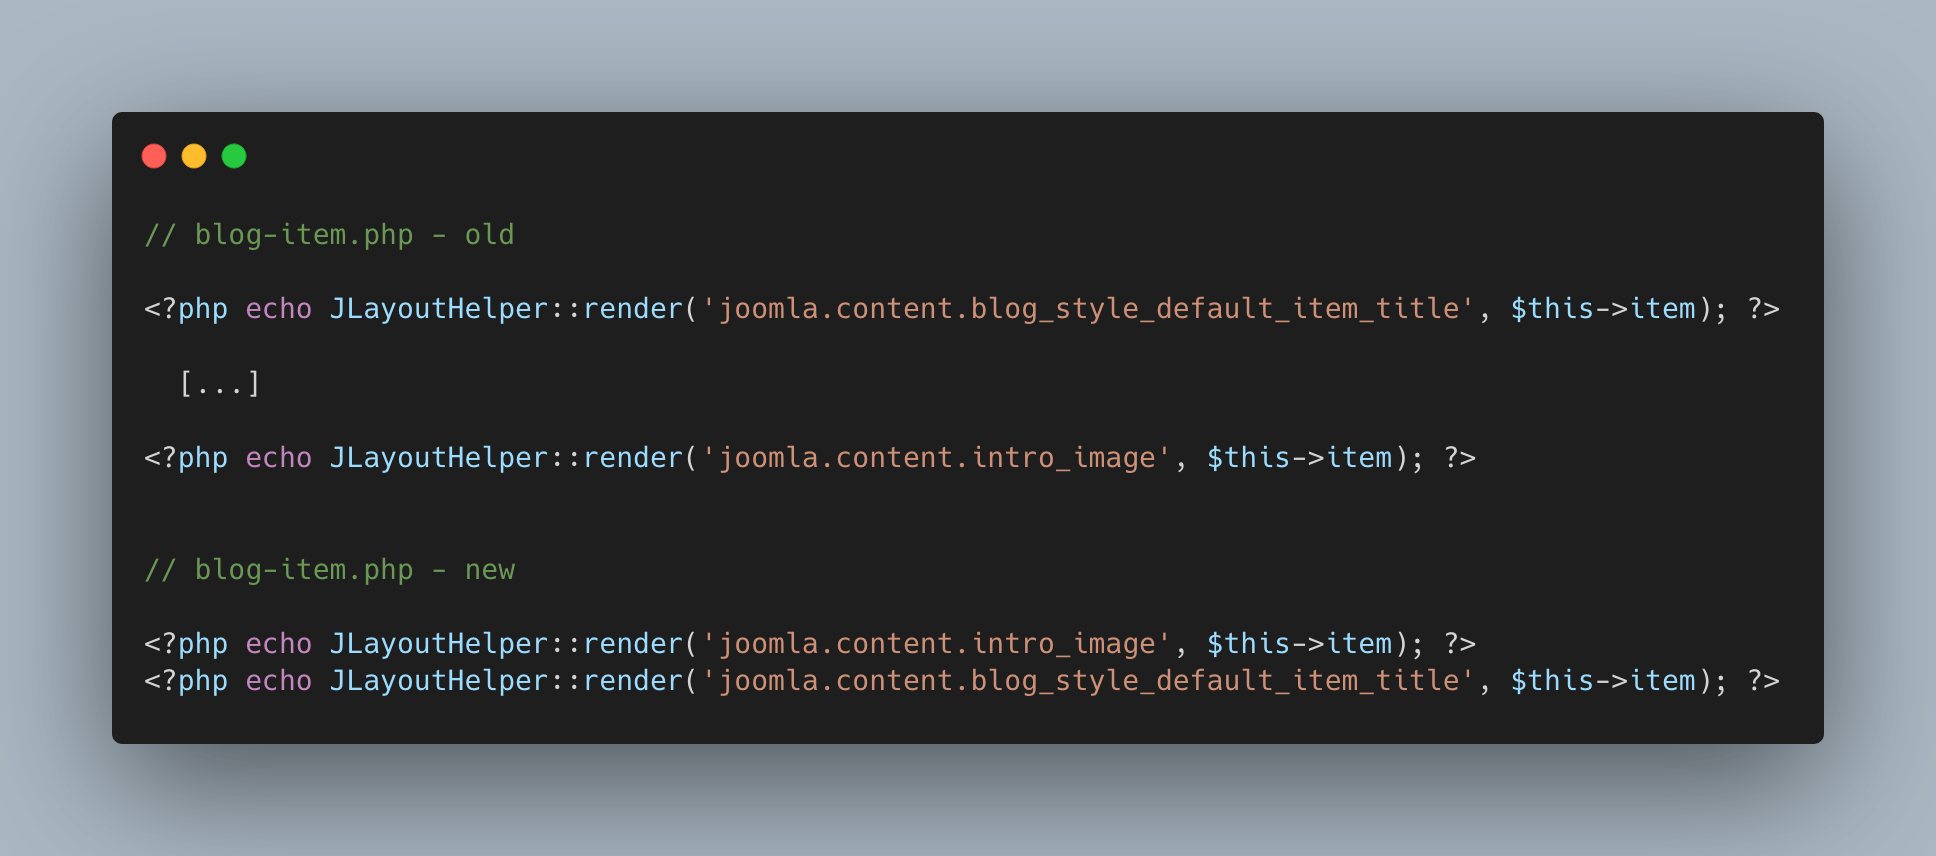
If we now reload the project page, we see that the order of the elements has changed and now corresponds to the guidelines of our layout
Output content - $this, $this->item, $this->item->XYZ
In case not only content blocks should swap their position, but further content related to the article should be added to the layout, there is a golden code snippet that lists all the entries of the article object.
$this -> item is the variable that contains the current article (the corresponding PHP object). With the help of the following code snippet, the post object can be output with the help of PHP, so that the desired information can be conveniently searched for and found.
<pre><?php var_dump($this->item); ?></pre>
For example, if we would like to output the alias on the page in addition to the post title, but are not sure how to get it, we can first output the complete post object in the frontend using the above code snippet.

There we quickly find what we are looking for. In this case, we now know that we can output the alias with the following code:
<?php echo $this->item->alias ;?>
In this case, we output the string "bananas-for-peace" which is 17 characters long in total.
Once we have found all the entries that will be output, we can then delete the output from our overwrite via var_dump.
Output custom fields in overwrite
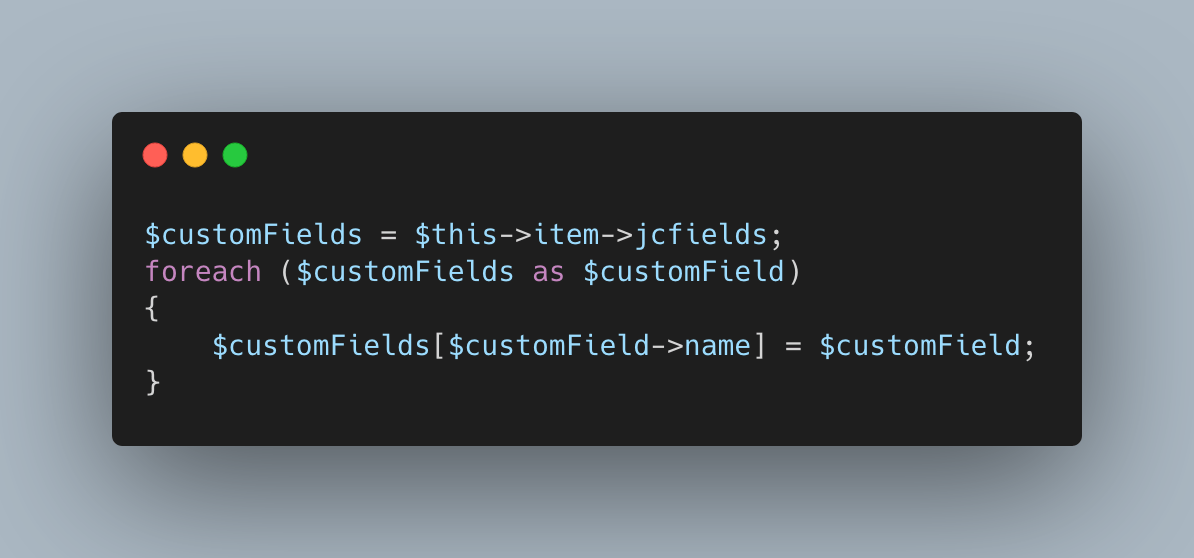
In the next step, we wanted to insert the subtitle, which was managed as a custom field, into our overwrite. To do this, we need to get order into our custom fields in the first step.
Order? Well, Joomla returns the custom fields as a so-called array - strictly speaking as an associative array, where the respective key for the call (i.e. the "name" of the element in the array) is the ID of the field. This is straightforward, but not very readable in code - after all, who knows what $customFields[1] was?
With the help of the following code, we therefore structure the custom fields of the article in a way that we can afterwards retrieve separate entries (value, label) of a custom field with the help of the name of the custom field.
$customFields = $this->item->jcfields;
foreach ($customFields as $customField)
{
$customFields[$customField->name] = $customField;
}
We can insert the code anywhere in the file, the only important thing is that the code is placed before the output of the custom field data.
Now that we have all the tools at hand, we can output the subtitle between the intro image of our post and the post title. The name of the custom field is "subtitle", accordingly we can output the content of the custom field with the following code:
<?php echo $customFields['subtitle']->value ;?>
Placed in the right place, the following code results:
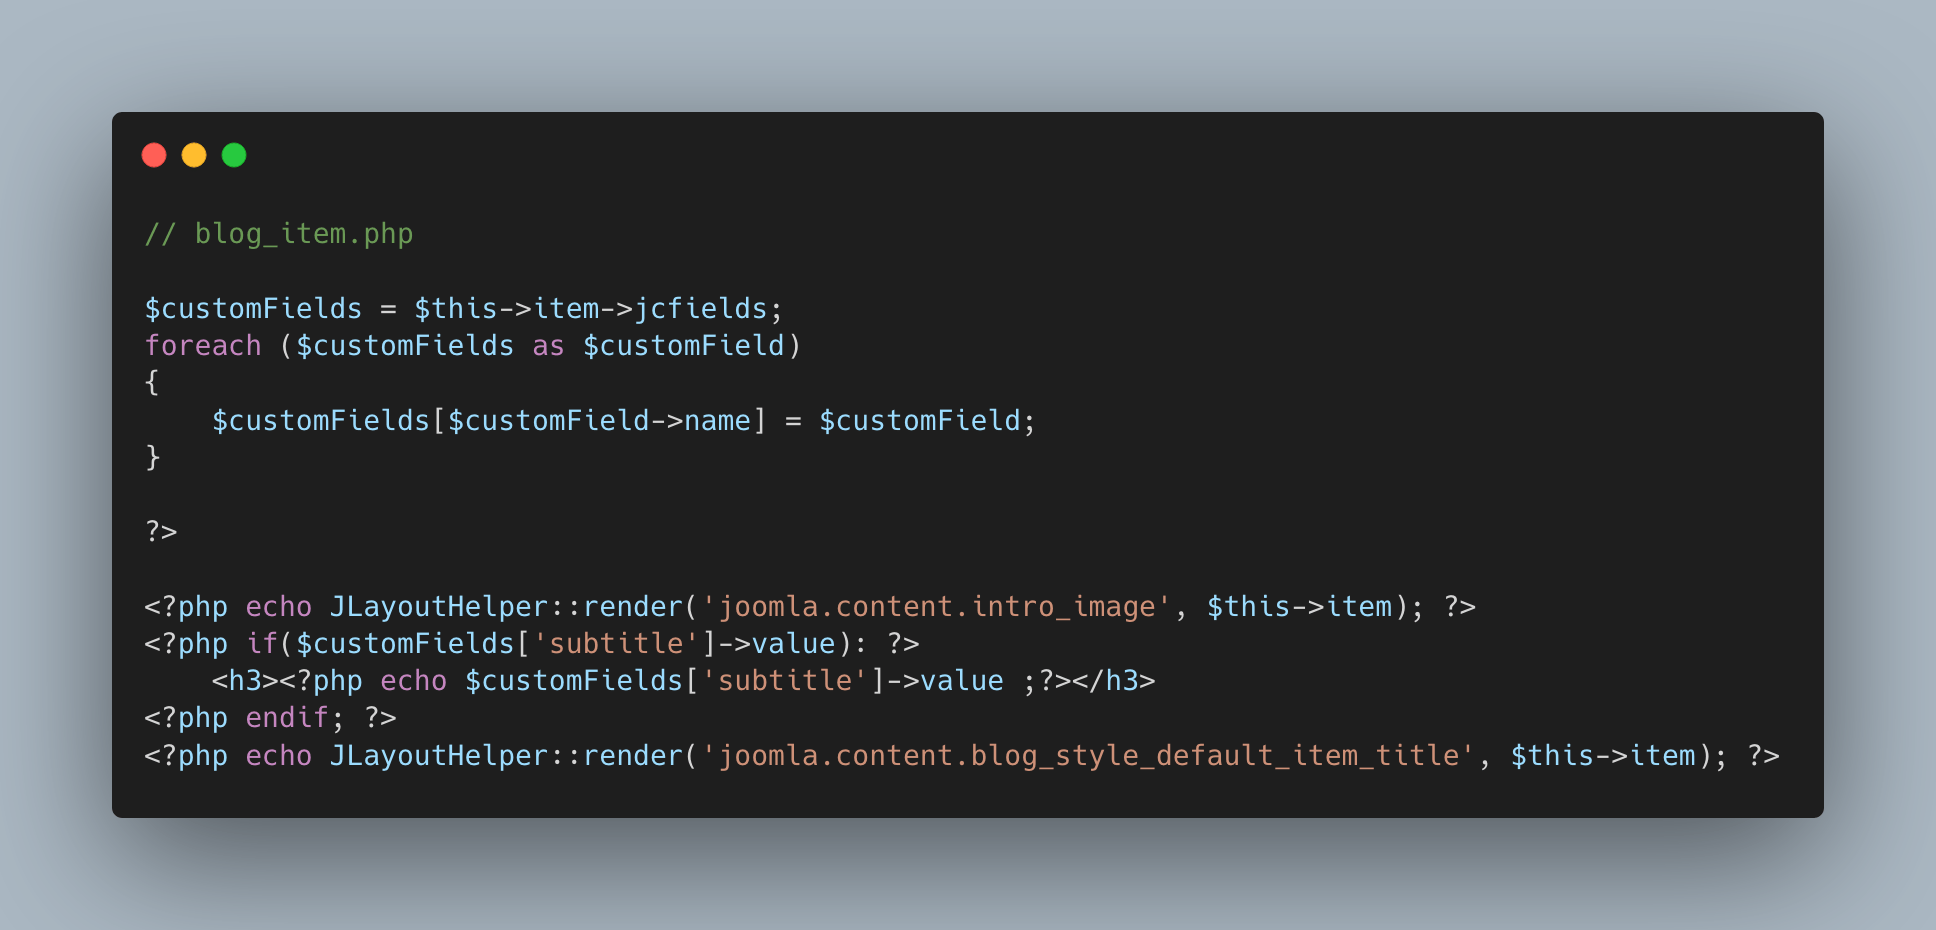
If we now look at our frontend, we will see that the subtitle (if it has been set) is output as desired between the intro image and the post title.
We have added a small if-query to the code to check in advance whether a value has been entered for the custom field that is output. This way we can prevent the output of an empty <h3>.
Now that we have adapted the HTML output of the output to our needs with the help of our first template overwrite, we can move on to the styling adjustments in the next step and transfer the desired design from the graphical drafts into code.
With the help of CSS-Grid, the desired layout can be implemented quickly and easily. We enter the text output above the actual blog entries as a category description, which is displayed above the blog entries.

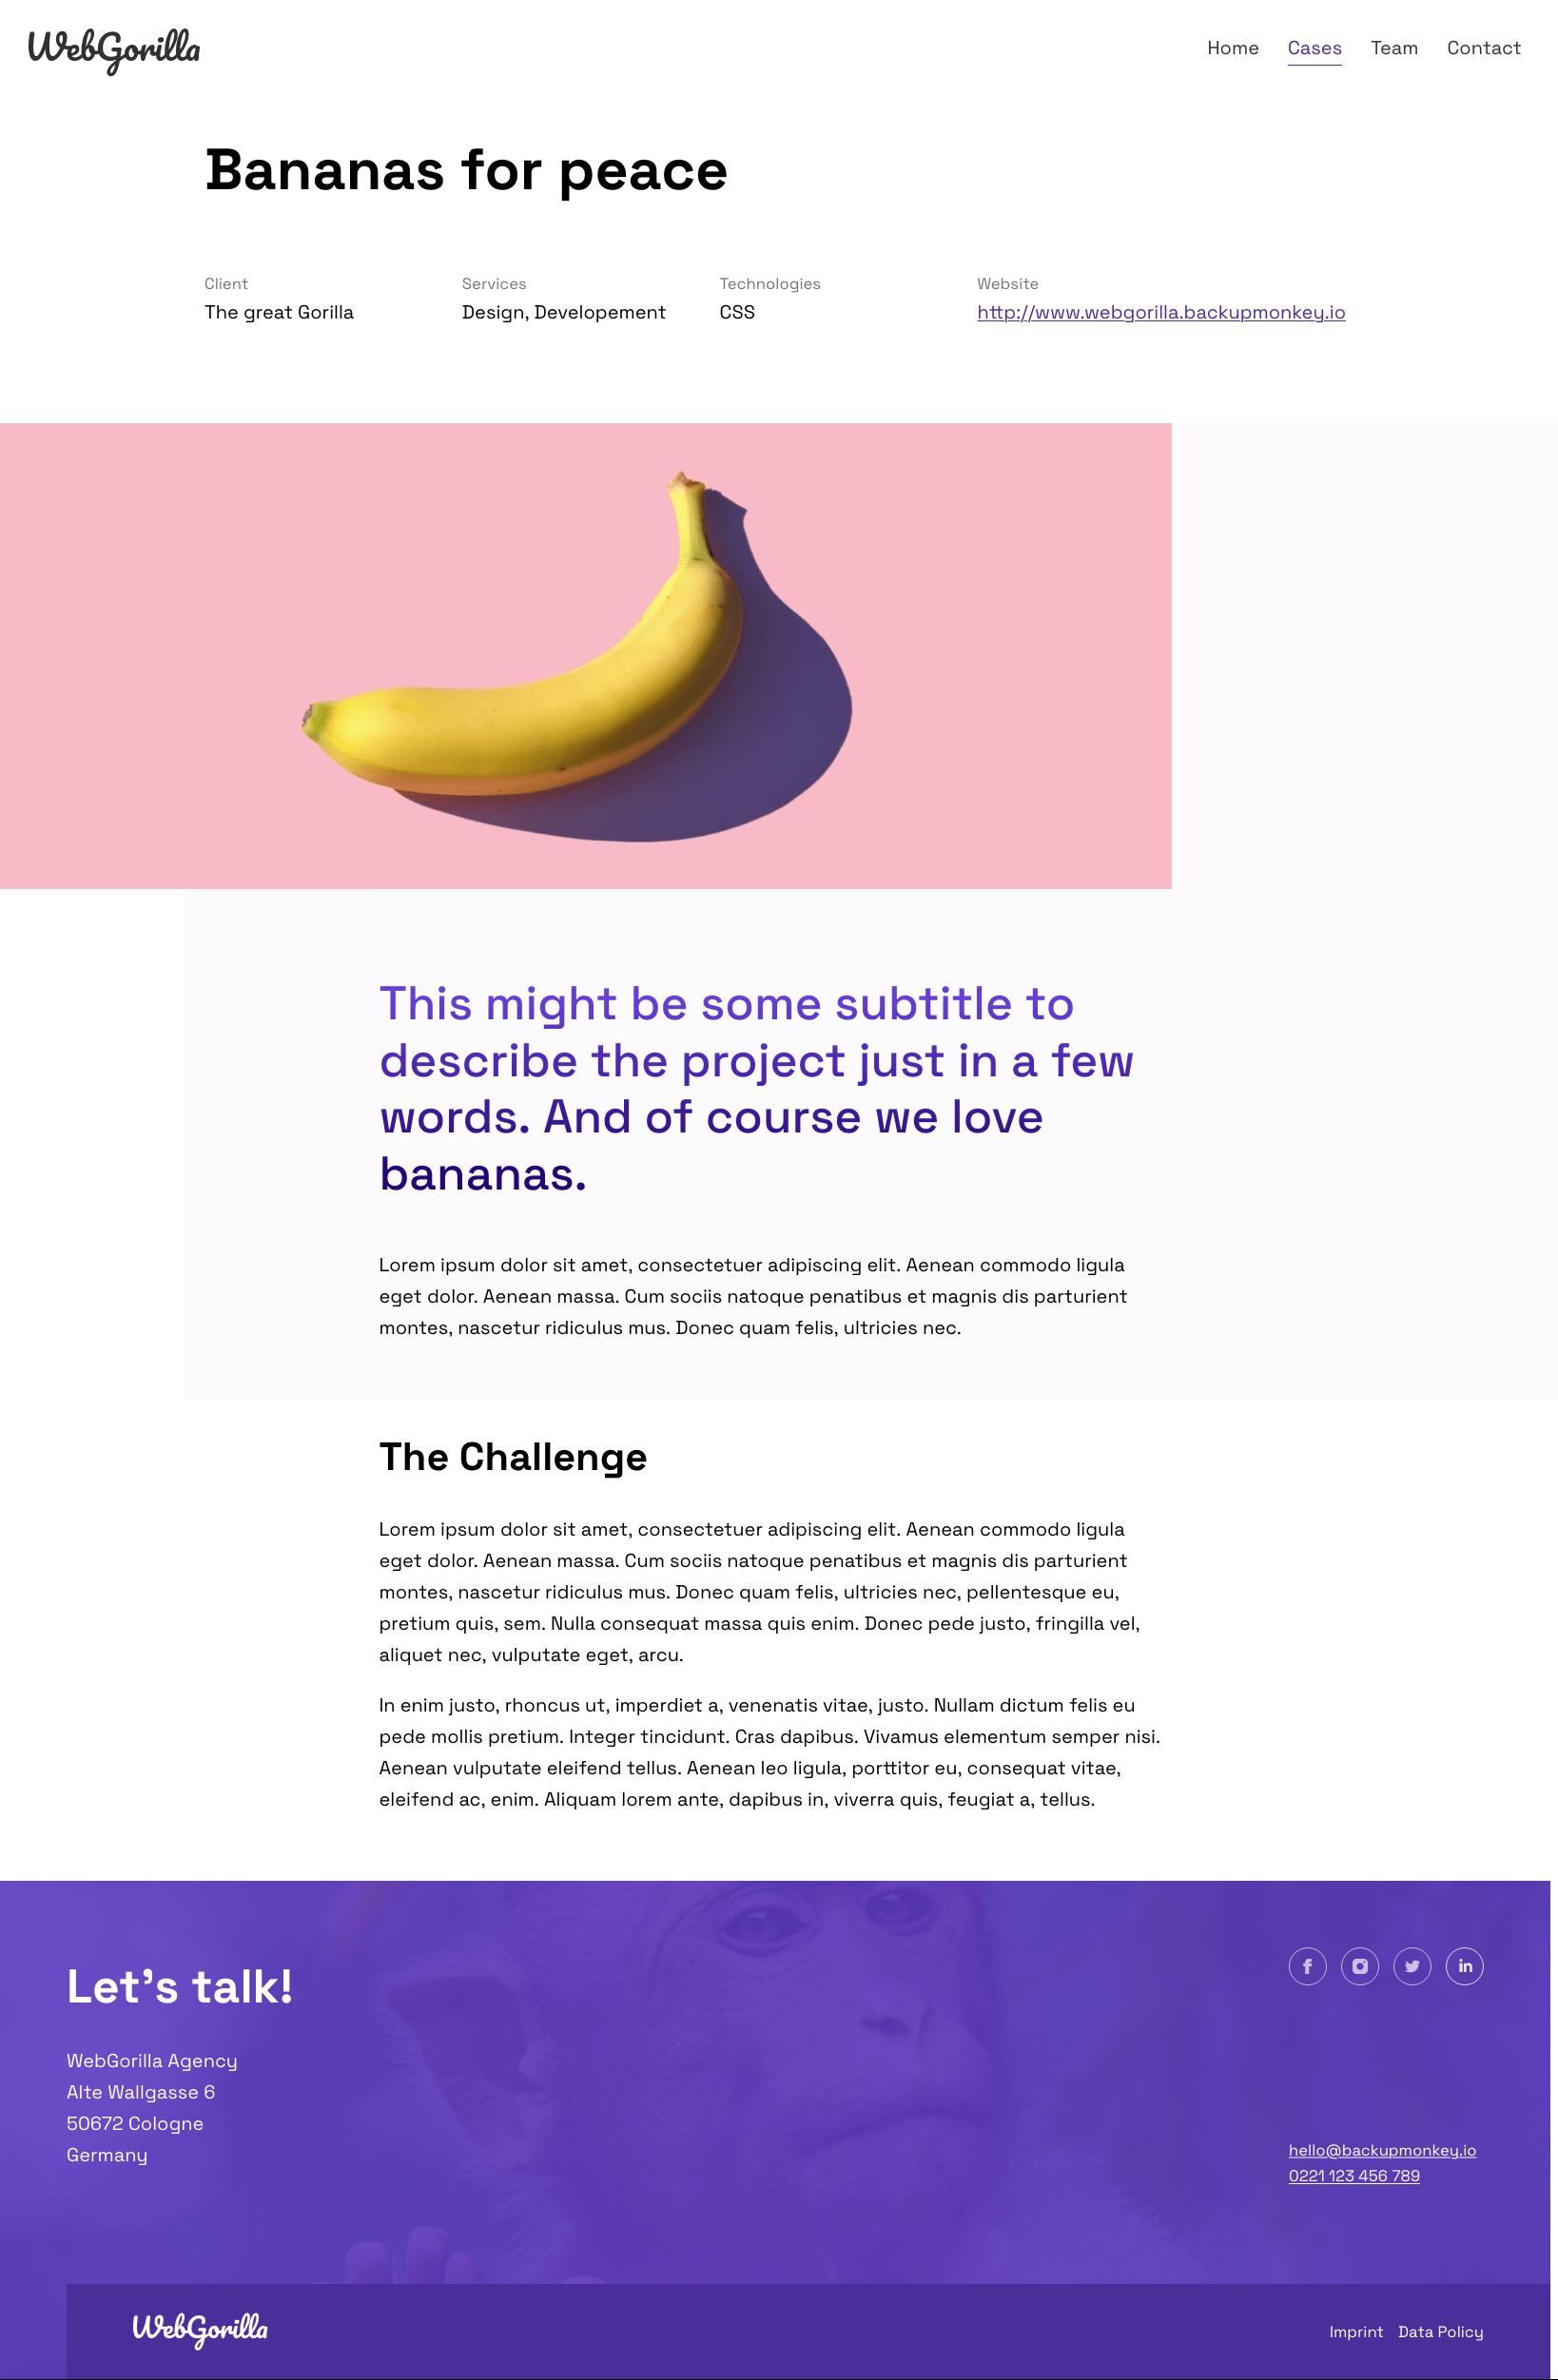
Projects detail page - flexible use of custom fields
After we have dealt with the overview page of the reference projects in the previous step, we now want to deal with the detail page of a project. On this page, in addition to a picture and text, further information about the project (services rendered, technologies, etc) should always be presented in the same layout.
Since in the case of the case studies we are dealing with individual articles, we have to create an overwrite for exactly this view. Here we go!
For the sake of clarity, here is the design that is to be implemented:
To do this, we will first create the desired markup structure with placeholder texts and then replace these with the contents of our custom fields.
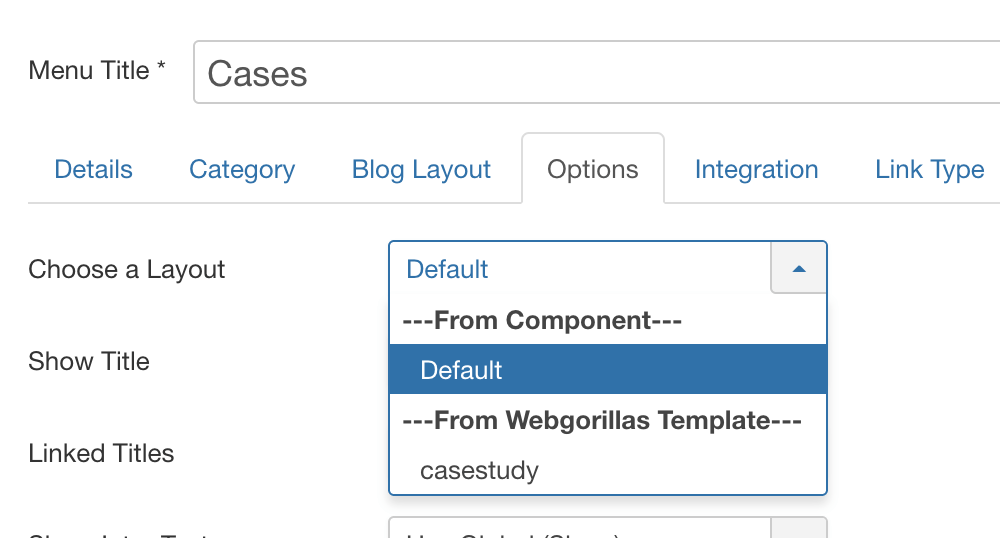
Create overwrite and provide as post layout
Many of you will already have noticed the "Layout" selection field in the "Options" tab of a menu item or post. With the help of template overwrites, it is not "only" possible to overwrite the standard Joomla output, but also to create different layouts for different purposes. In the case of our example, we can create a separate layout for references, but blog posts and text pages such as the imprint remain unaffected.
To do this, we first go the same way as before and create a new template overwrite for the com_content / article view via the administration interface. The desired files have now been added to the html folder in our template directory.
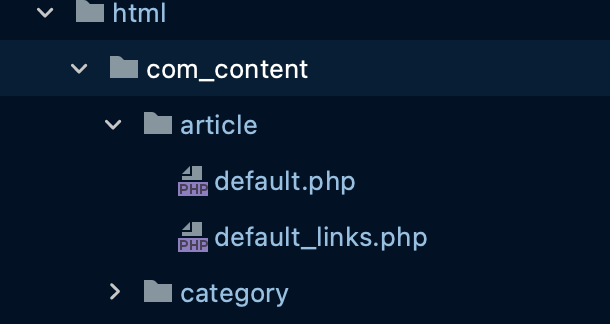
In a second step, we now rename the files default.php and default_links.php to casestudy.php and casestudy_link.php to create a new layout.
In the administration interface, both layouts are now available to us. There we select the layout we want and save the menu entry.
Caution: Please note the inheritance concept of parameters in Joomla.
Adjusting the markup of the detail page
In this overwrite, we also structure our custom field content first, as we did on the overview page, using the familiar code snippet.
We can then output the information about the project as a "definition-list" below the headline.
The post image (fullimage) follows, below which a short introduction, which we have previously entered in a custom field, as well as the intro text and the post text are displayed.
Let's start with the article image. The article image is already displayed and must be included in our file. After a quick search, we find the relevant code section:

Unlike the intro text, for example, we see that the fullimage is not directly loaded at this point, but a layout is loaded with the help of the JLayoutHelper function.
So if we wanted to edit the output of the article image, we would have to edit the corresponding layout (Joomla/Content/Fullimage). Layout overwrites follow the same structure as template overwrites and can also be created via the backend.
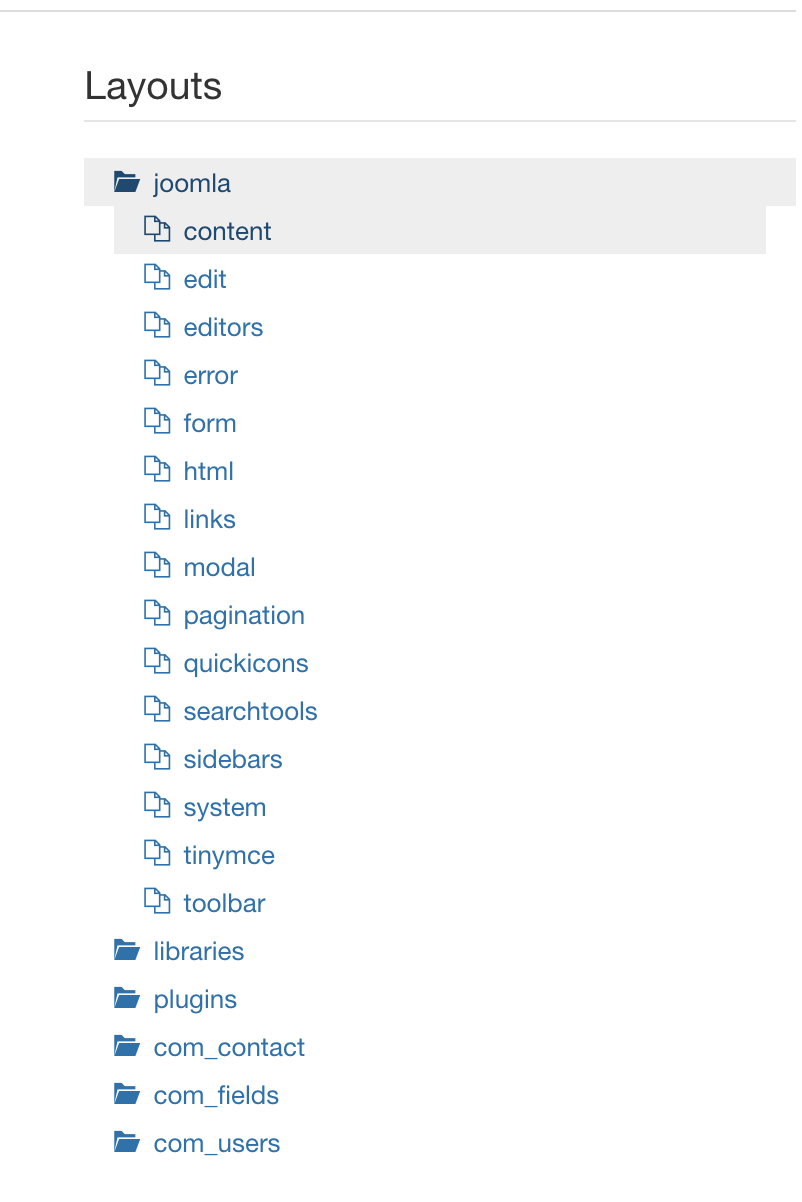
Since this is not necessary in this case, we will skip this point. However, it is important that you know that and how to edit layouts to create the desired output for page elements.
Below the article image, we now insert the content of our custom fields and the intro text as usual. Both contents are placed in div-element, which works as a container for styling reasons. Below this, we display the content of the article WITHOUT the intro text using $this->item->fulltext.
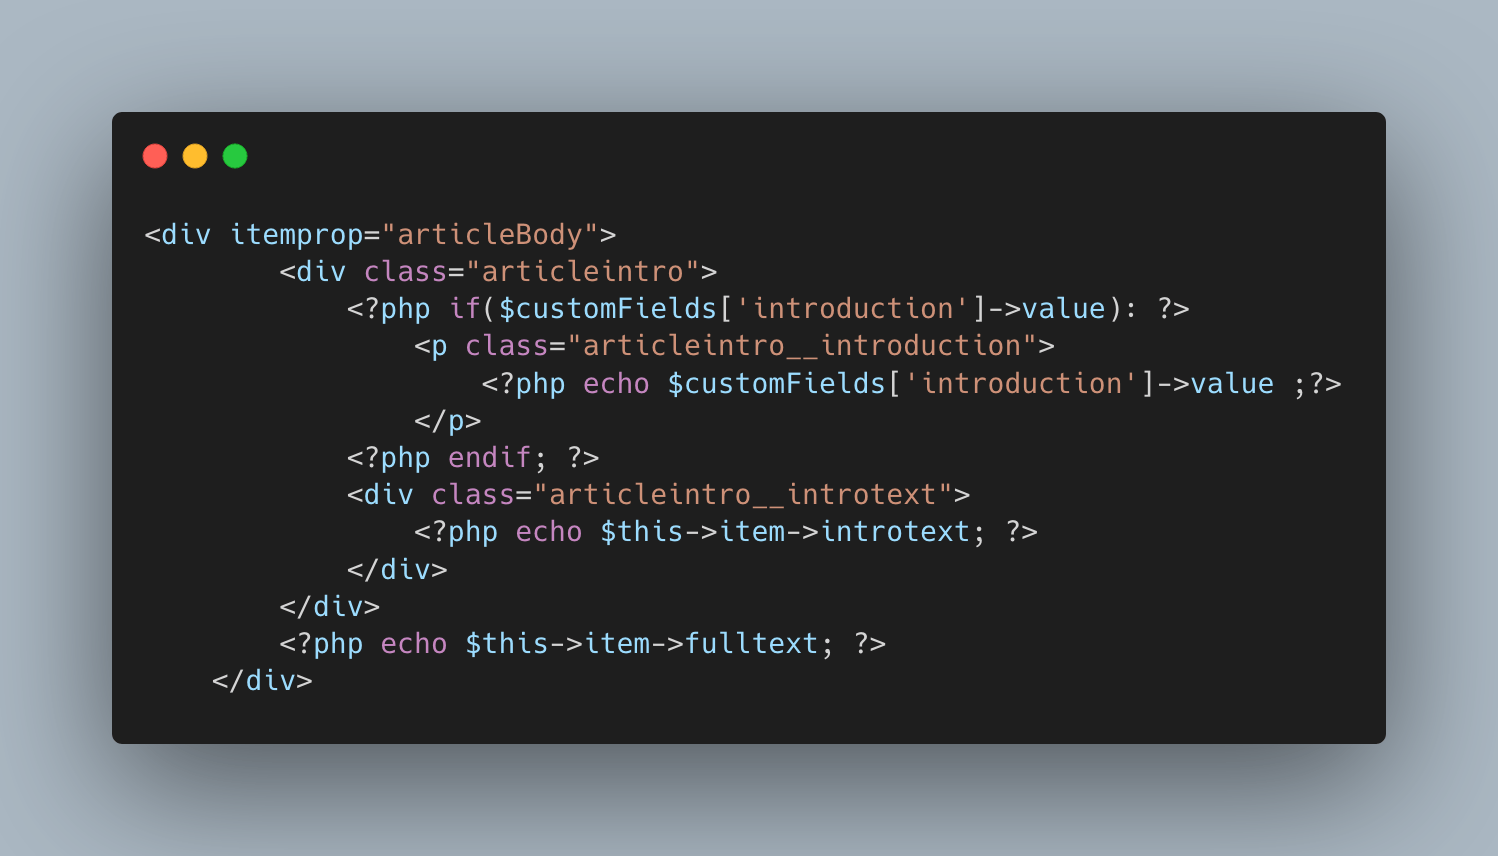
We've got it - we' ve now stored all the content and the appropriate markup structure for displaying the required layout in our overwrite and can now style it according to the layout instructions with the help of CSS.
A few minutes of CSS magic later, the page already looks as desired:
In the next part of our tutorial, we would like to build the three missing pages together with you: Home, Team and Contact and thereby deepen the newly gained knowledge.
We hope that our tutorial has made it easier for you to get started with the development of Joomla! templates. If you have any questions or feedback on our article, you can of course contact us at any time via email or social media. We look forward to your feedback.